- Как установить Add-On Ped скины в GTA 5
- Установка нужных программ и компонентов
- Стандартная установка:
- Упрощенная установка
- Настройки и установка Add-On Ped скинов
- Настройки:
- Установка скинов
- Как поменять скин в игре
- Не открывается ped selector гта 5. Как добавить новую модель в мод AddonPeds
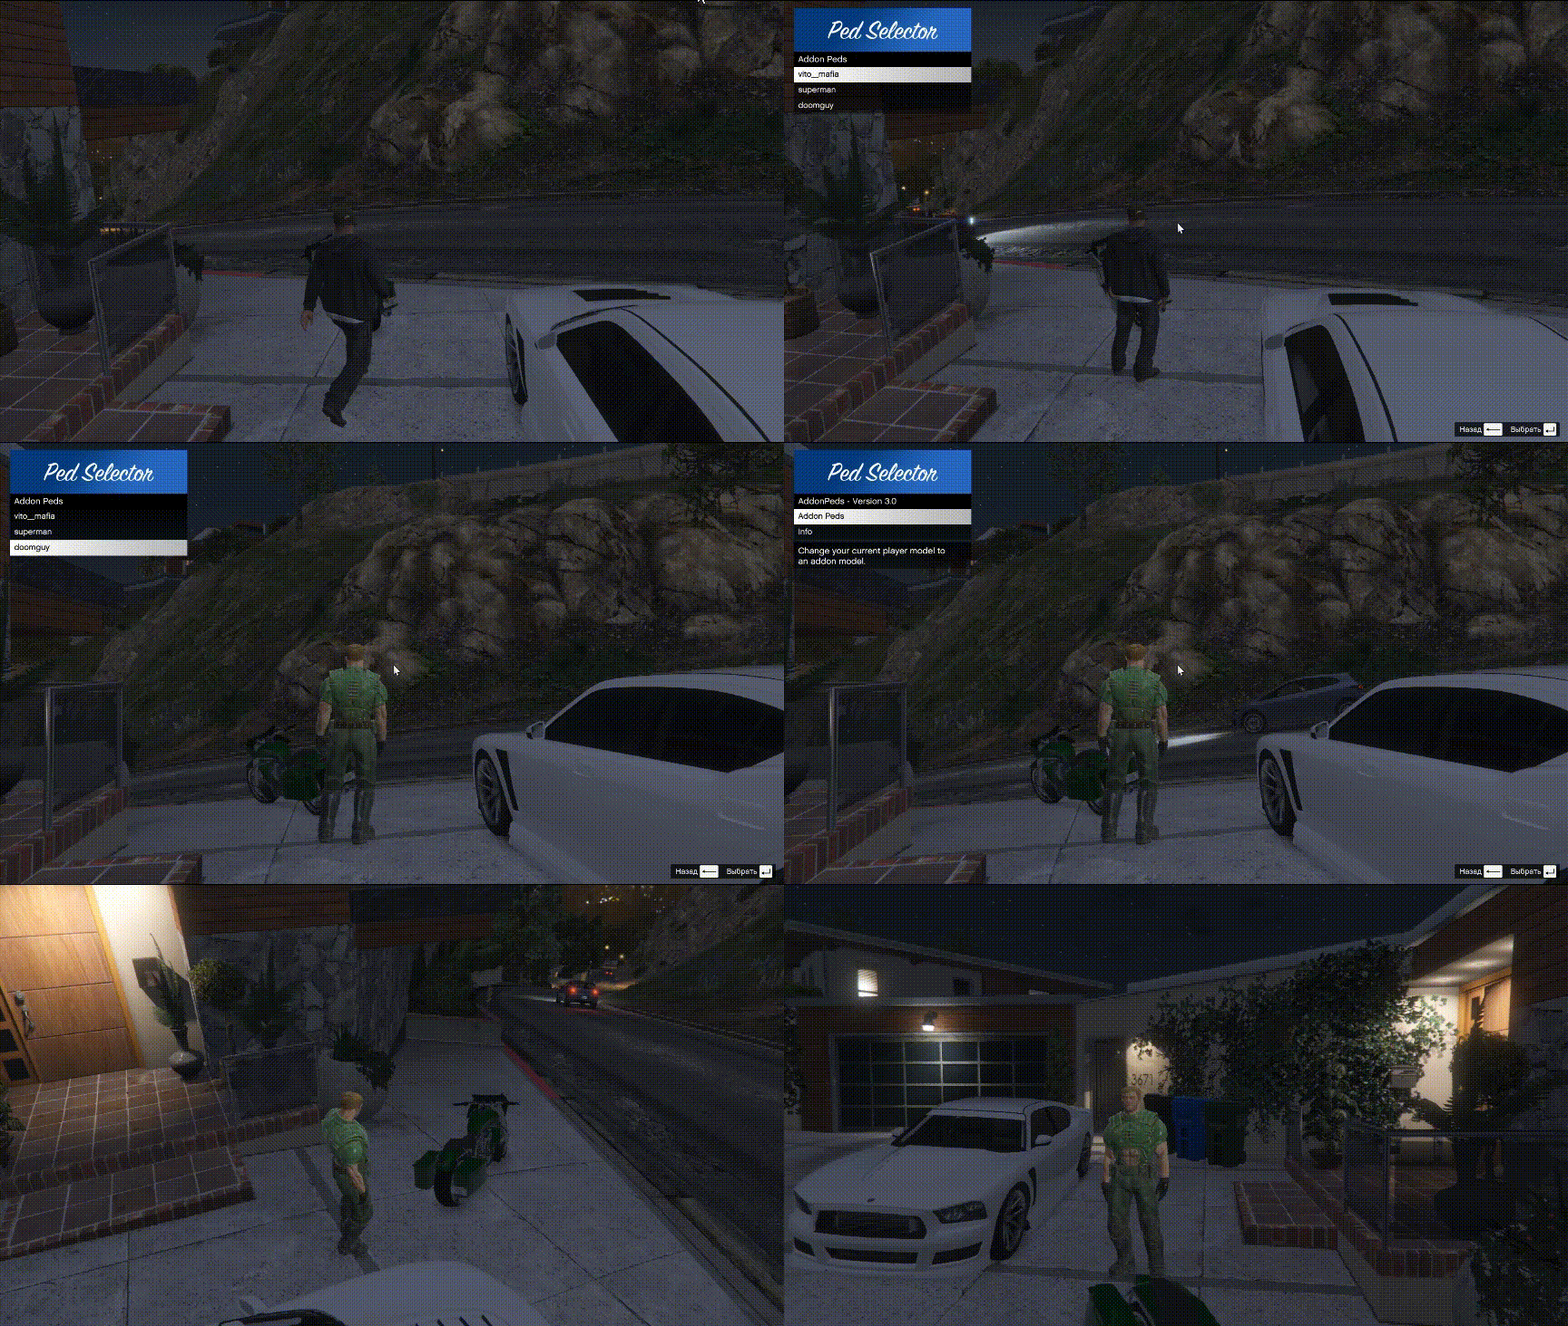
- Скриншоты мода AddonPeds:
- Как установить мод AddonPeds?
- Как добавить новую модель в мод AddonPeds?
- Why Use the AddonPeds GTA 5 Mod?
- Не работает addon peds gta 5
Как установить Add-On Ped скины в GTA 5
В этой статье мы расскажем, как установить скины в ГТА 5. Это не только текстовая инструкция – после всех важных пунктов вы сможете посмотреть визуальный пример установки, чтобы исключить любые недоразумения.
Если вам покажется, что установить скины Add-On Ped для GTA 5 очень сложно, то это не так, основные процедуры проделываются всего один раз и далее нужно будет только выбирать скины и добавлять их в игру. Потому немного терпения понадобится только для первоначальной настройки всех компонентов. Далее всё будет очень просто.
Важно! Мы сделали инструкцию со стандартной и упрощенной установками. В стандартной описаны все шаги и желательно следовать именно им, чтобы персонально знать всю последовательность установки, но после полной инструкции мы подготовили немного упрощенный вариант на случай, если у вас возникли какие-либо проблемы или путаница.
Приступим к первоначальной установке нужных компонентов.
Установка нужных программ и компонентов
Перед добавлением новых скинов, нужно скачать и установить все необходимые программы, которые понадобятся!
Стандартная установка:
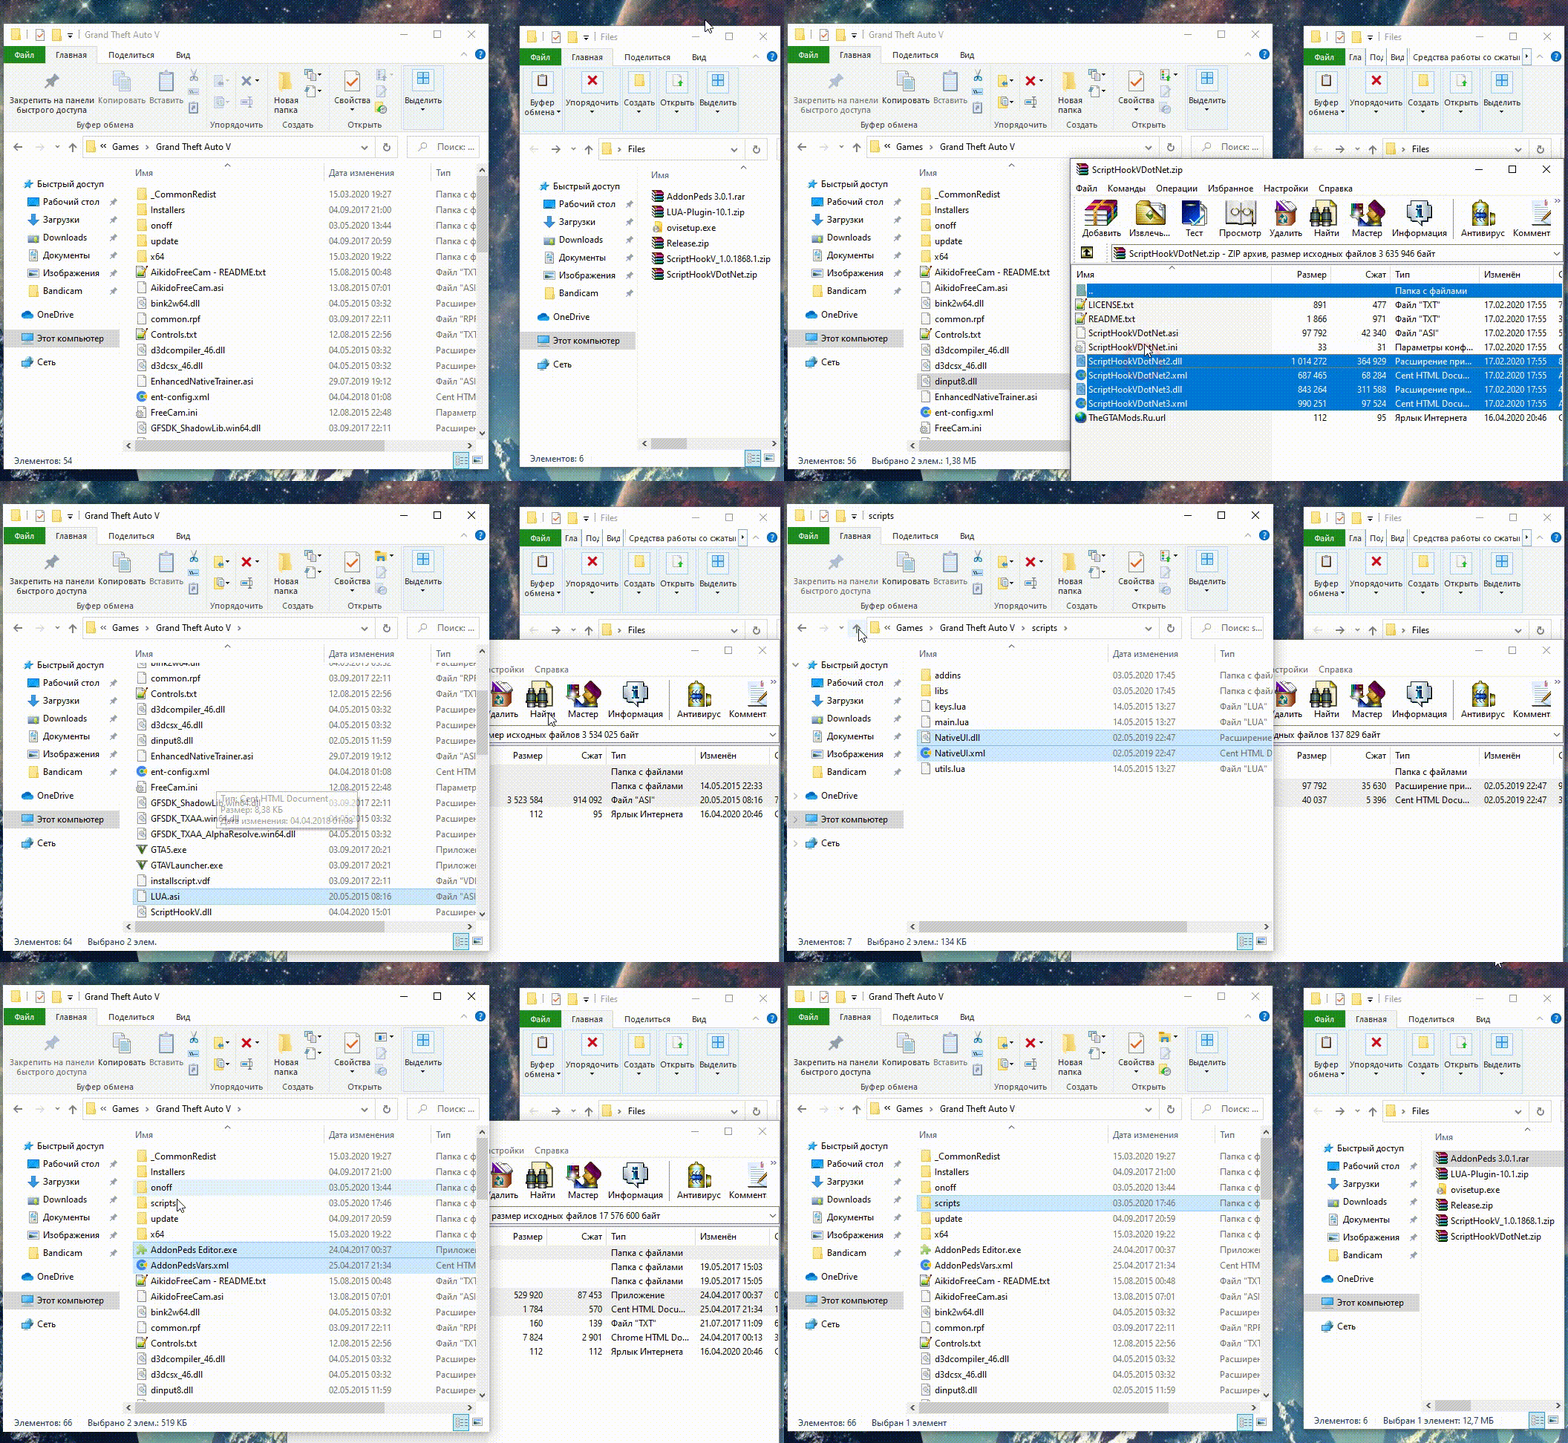
1. Script Hook V: распаковываем файлы .dll в папку с игрой.
2. Script Hook V .Net: распаковываем файлы .asi, .ini, .dll и .xml в папку с игрой.
3. Lua Plugin: распаковываем файл LUA.asi и папку «scrips», которая находится в папке с игрой.
4. NativeUI: распаковываем все файлы архива в папку «scripts», которая находится в папке с игрой.
5. AddonPeds:
– Распаковать файлы AddonPeds EPedsditor.exe и AddonPedsVars.xml в папку с установленной игрой.
– Откройте в архиве папку «scripts» и перенесите файл PedSelector.dll также в папку «scripts», которая находится в директории с уставленной игрой.
В архиве остается папка «dlcpacks», она нам тоже понадобится, но для начала нужно установить программу OpenIV.
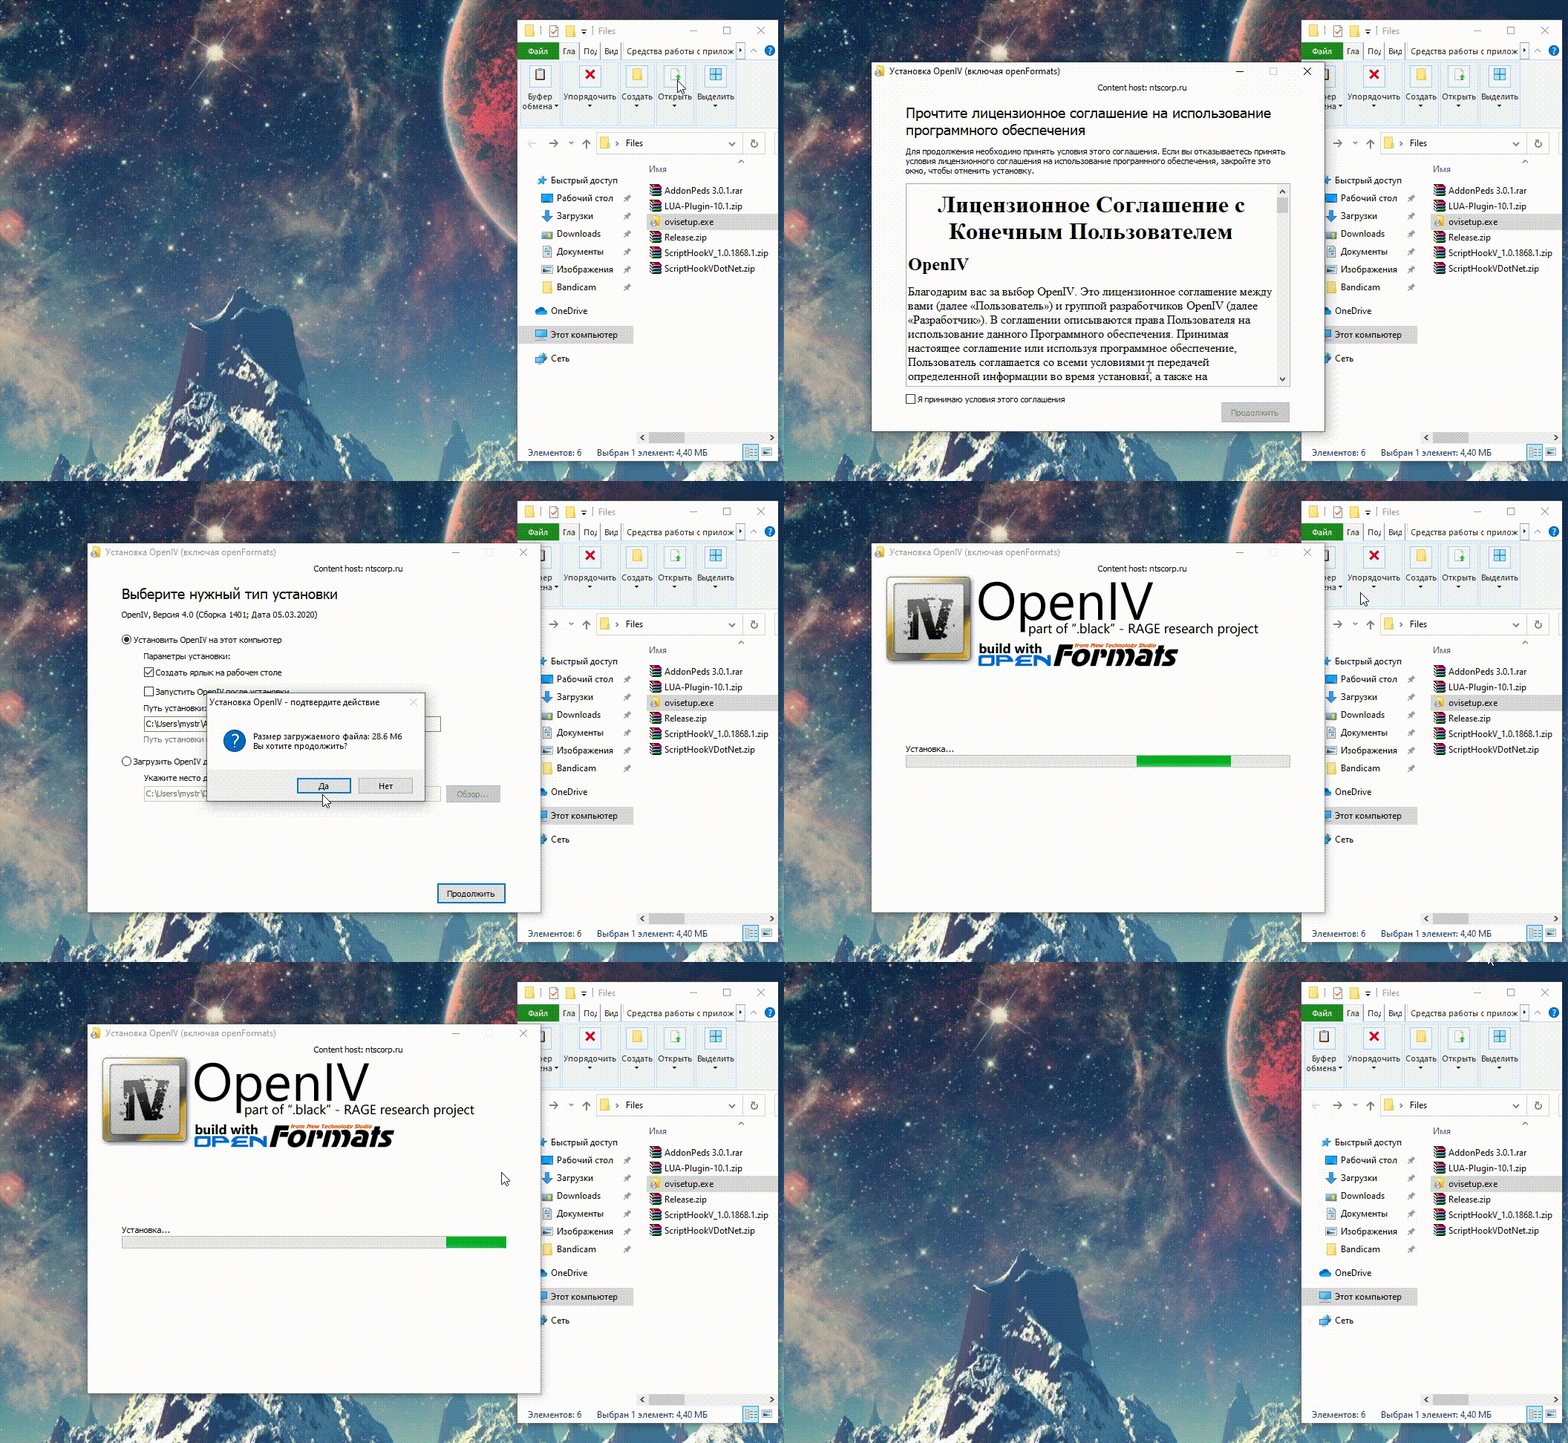
6. OpenIV: у программы стандартная установка, как и у любых других программ.
Проделали все пункты вручную? Поздравляем! Вы можете переходить к инструкции по настройке и добавлению скинов, пропуская упрощенную установку. Если же что-то не вышло, то ознакомьтесь с упрощённой установкой, которая находится ниже и следуйте её пунктам.
Упрощенная установка
Важно! Мы собрали архив, с помощью которого нет необходимости проделывать большинство пунктов, описанных в стандартной инструкции, этот вариант легче и избавляет от возможных ошибок, но некоторые действия все равно нужно сделать самостоятельно.
Качаем архив EasySkins – Скачать, в нём находятся папки:
1. OpenIV – устанавливаем, как обычную программу.
2. Components – распакуйте содержимое в папку с игрой.
3. Addonpeds – зачем нужна, узнаете далее.
На этом с установкой нужных файлов всё, правда легко? Но не забывайте, что нам далее ещё понадобится папка «addonpeds». Поэтому, переходим к настройкам.
Настройки и установка Add-On Ped скинов
Настройки:
Наступает финишная прямая, остаётся всё настроить и узнать, как добавить скины в GTA 5 и выбирать их в игре.
Что же, приступим:
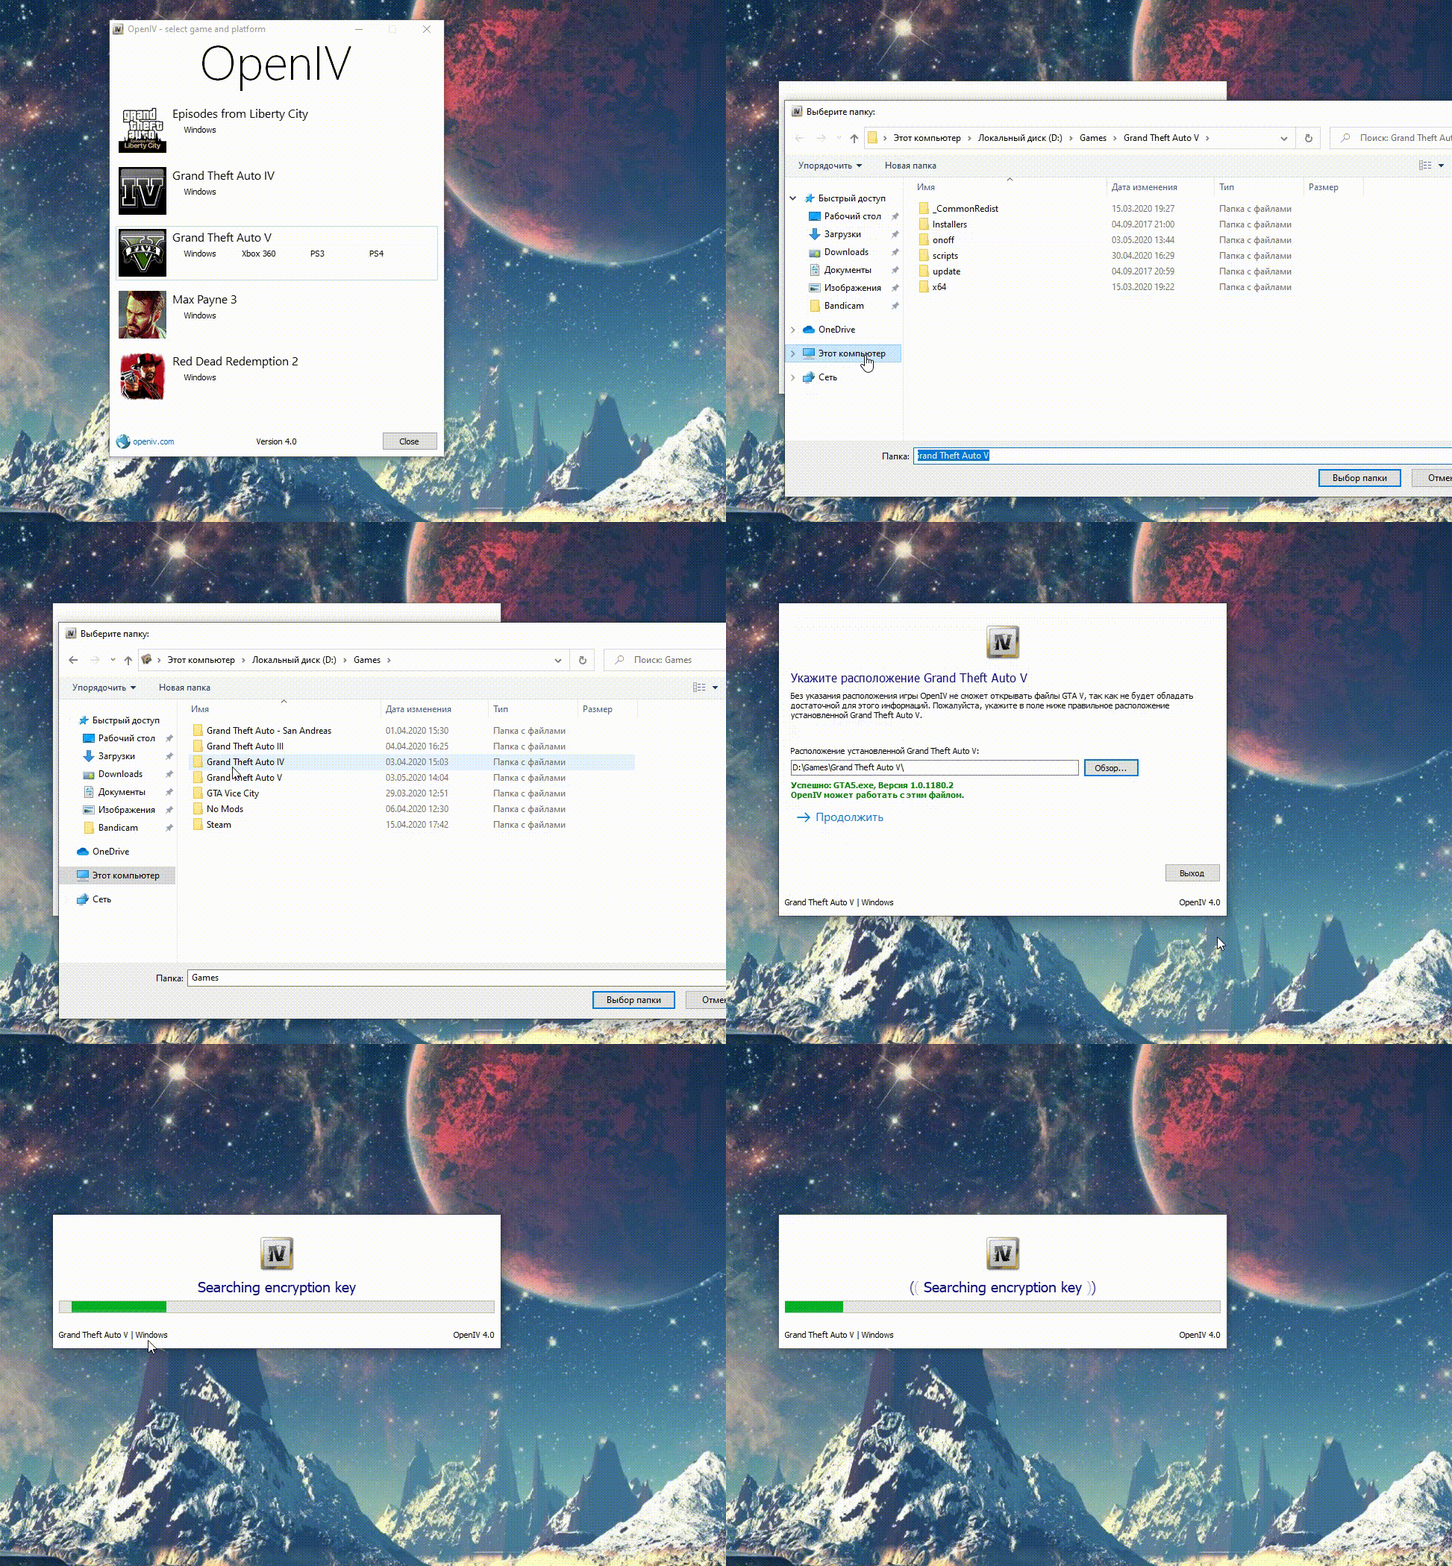
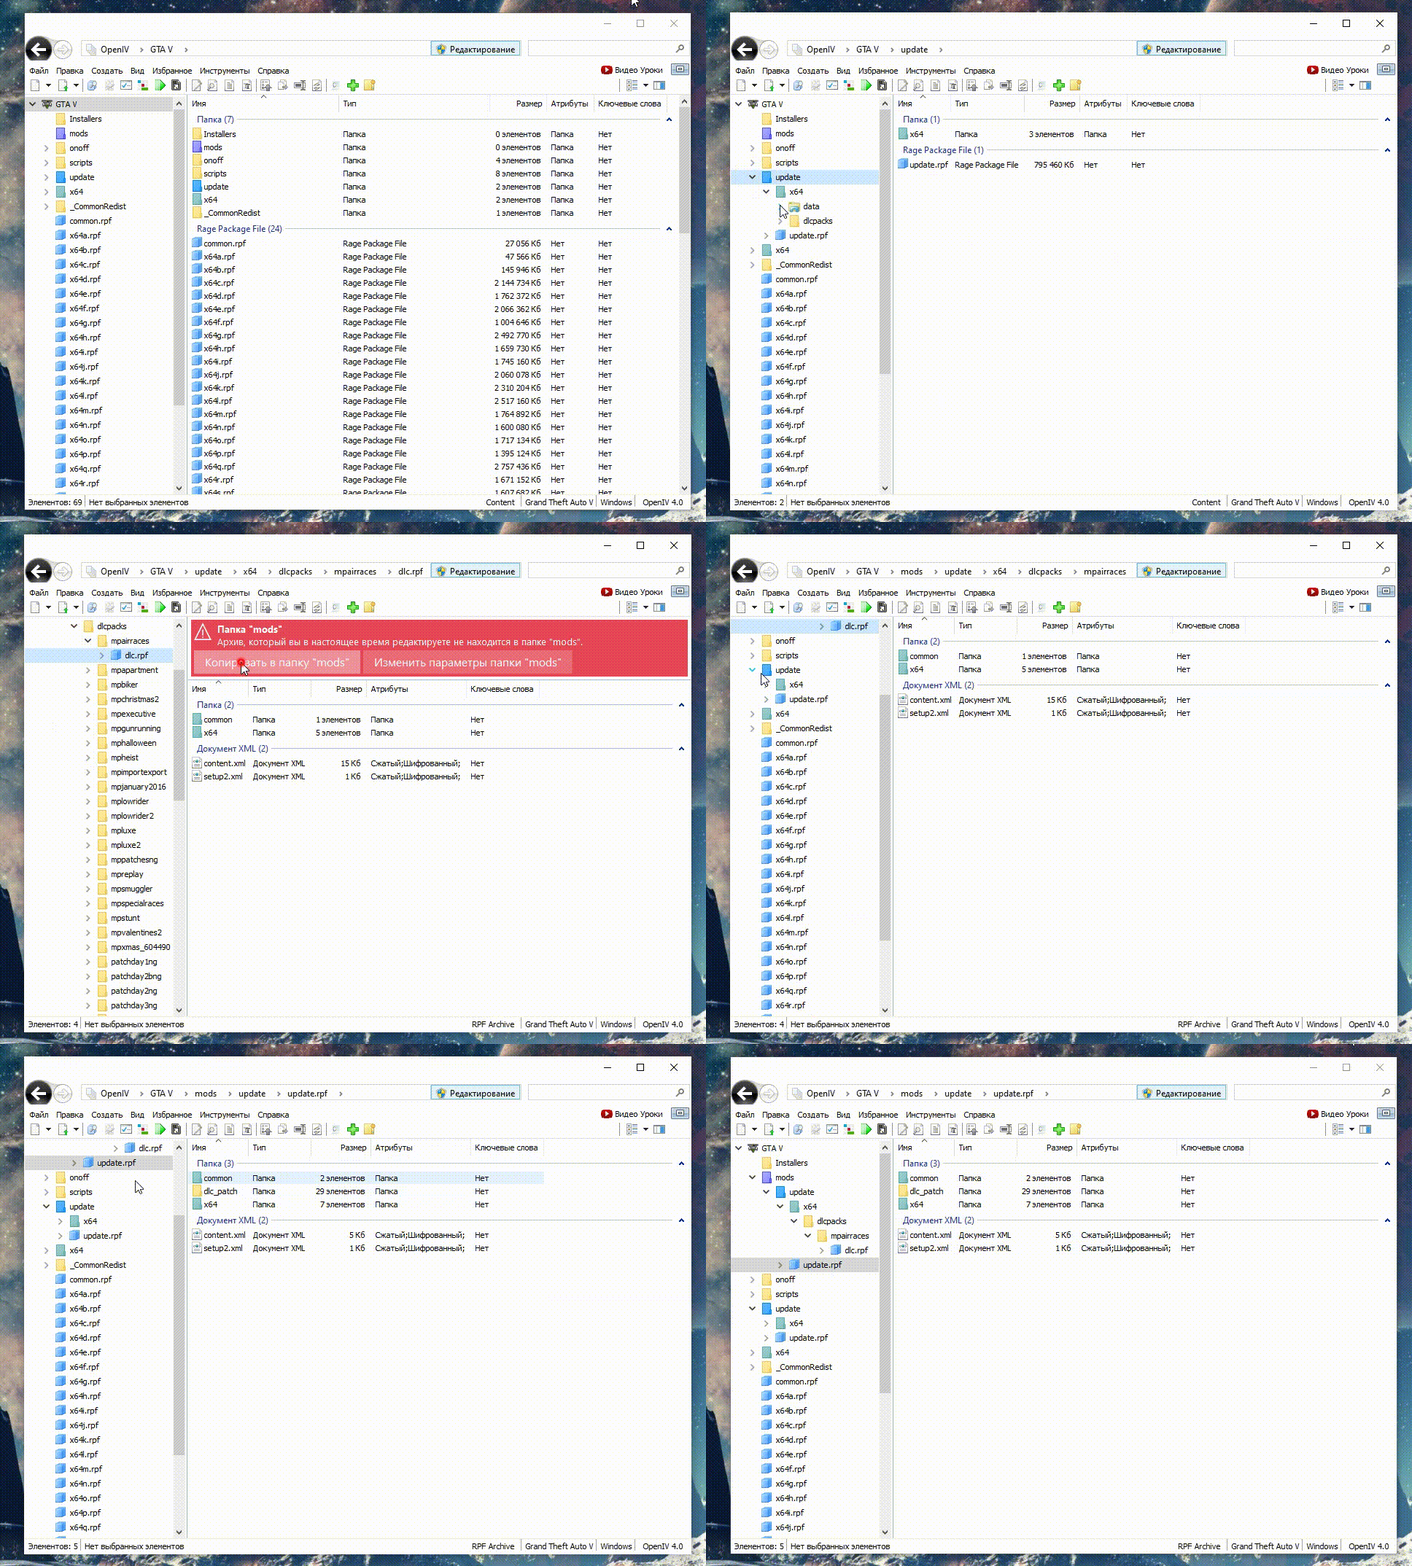
1. Запускаем установленный OpenIV и выбираем Grand Theft Auto V – Windows.
2. Указываем расположение папки с установленной GTA 5 и жмём продолжить.
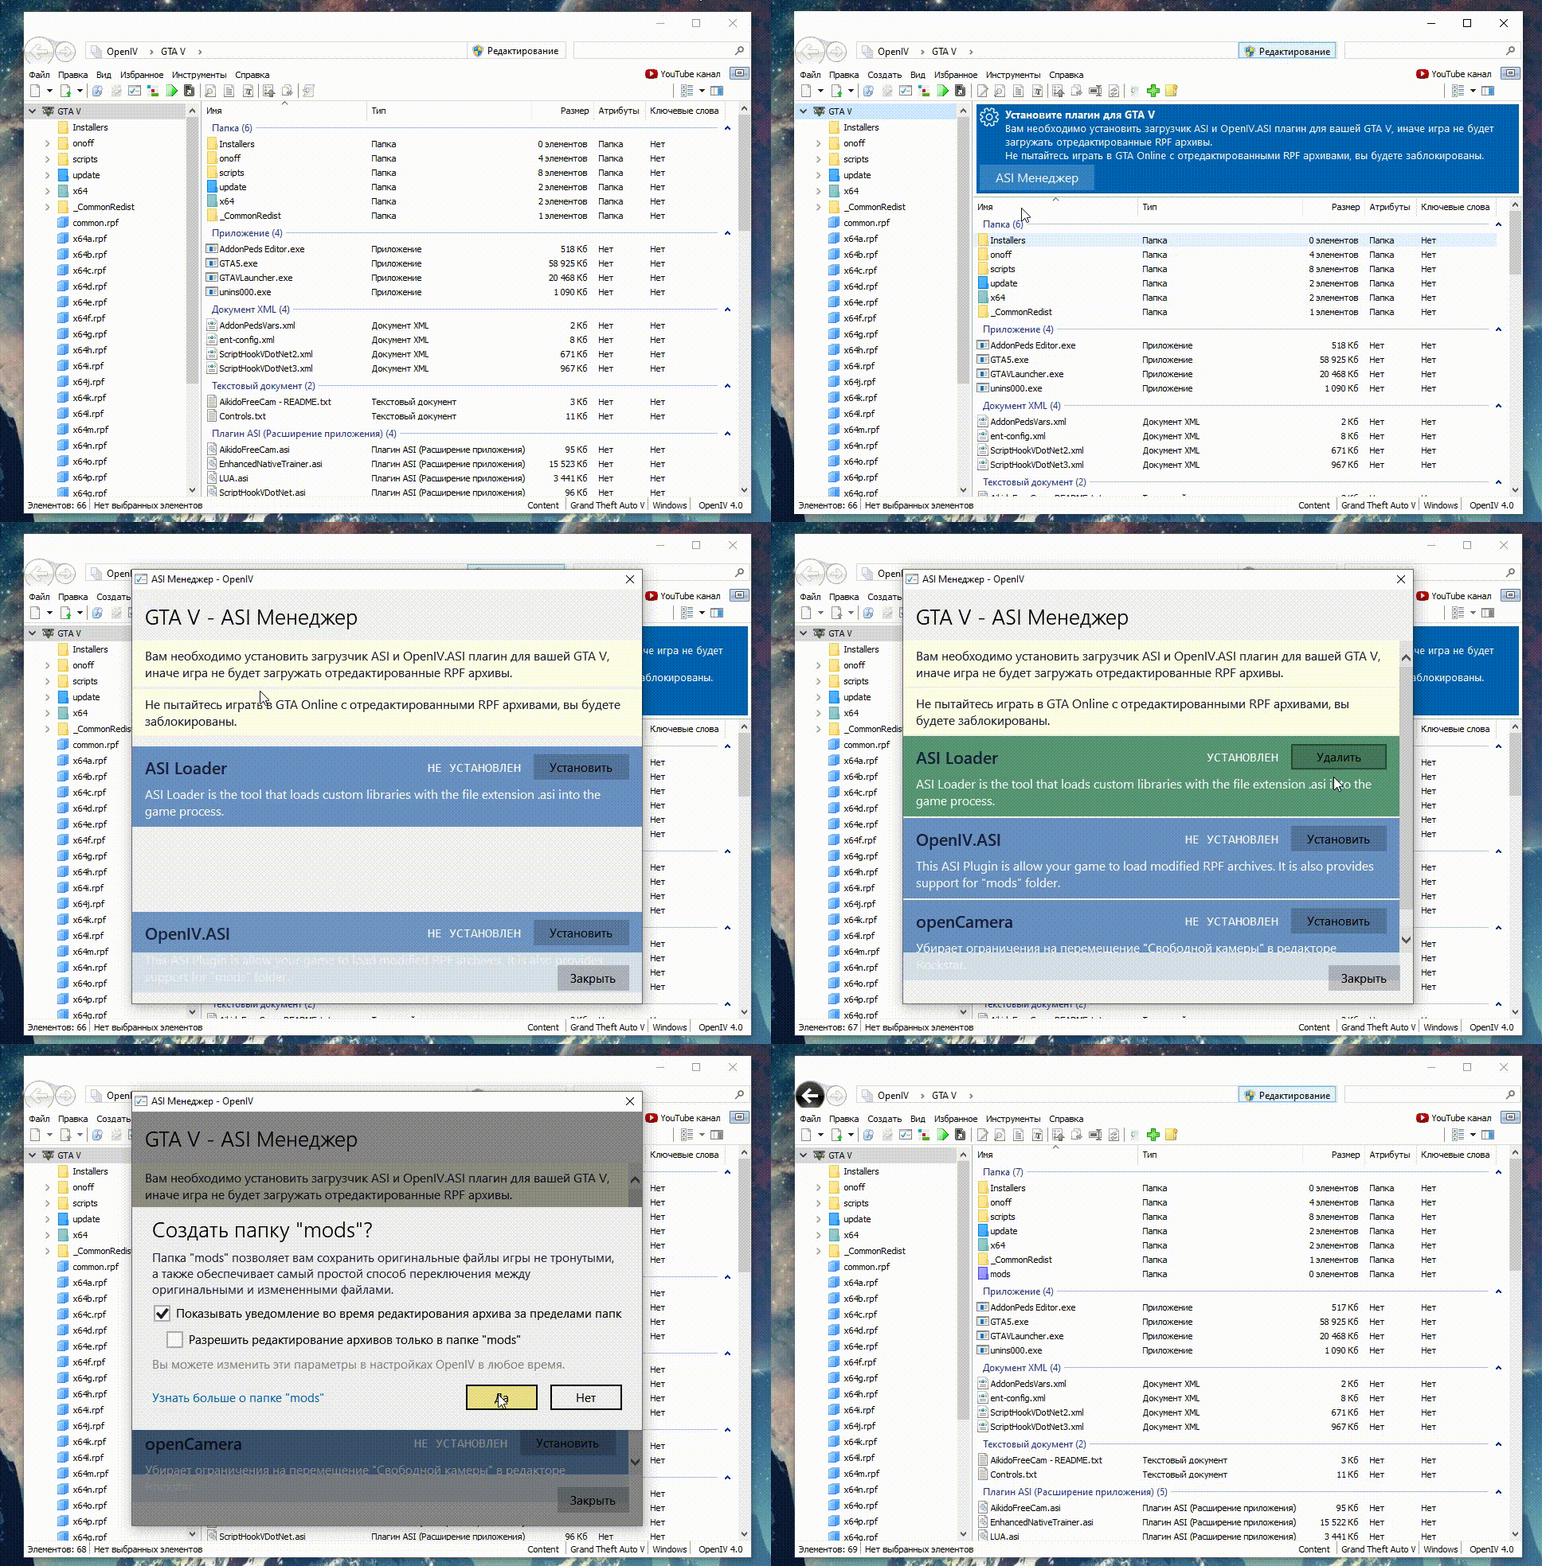
3. После запуска программы жмём кнопку «Редактирование», это необходимо для того, чтобы включить режим редактирования файлов.
4. Переходим в «Инструменты — ASI менеджер», чтобы убедиться, что установлены Asi Loader и OpenIV.ASI. Если они не установлены, то нажмите установить.
Когда нажмёте установить OpenIV.ASI, появится окошко с предложением «Создать папку “mods”?» – жмём «Да». Она понадобится для установки Addon Peds.
5. Теперь нужно в боковом меню выбрать папку «update» и в ней открываем путь x64 – data – dlcpacks в последней папке будет много других папок, открываем любую, например «mpairraces», и нажимаем на файл dlc.rpf, откроется окошко, в котором будет красный баннер, жмём в нём кнопку «Копировать в папку “mods”».
После этих действий в папке «mods» появится копия выбранных файлов (путь папок можно создать вручную, но так быстрее).
6. Далее снова возвращаемся к оригинальной папке «update» и выбираем файл update.rpf, выбрав его, также появится красный баннер – копируем.
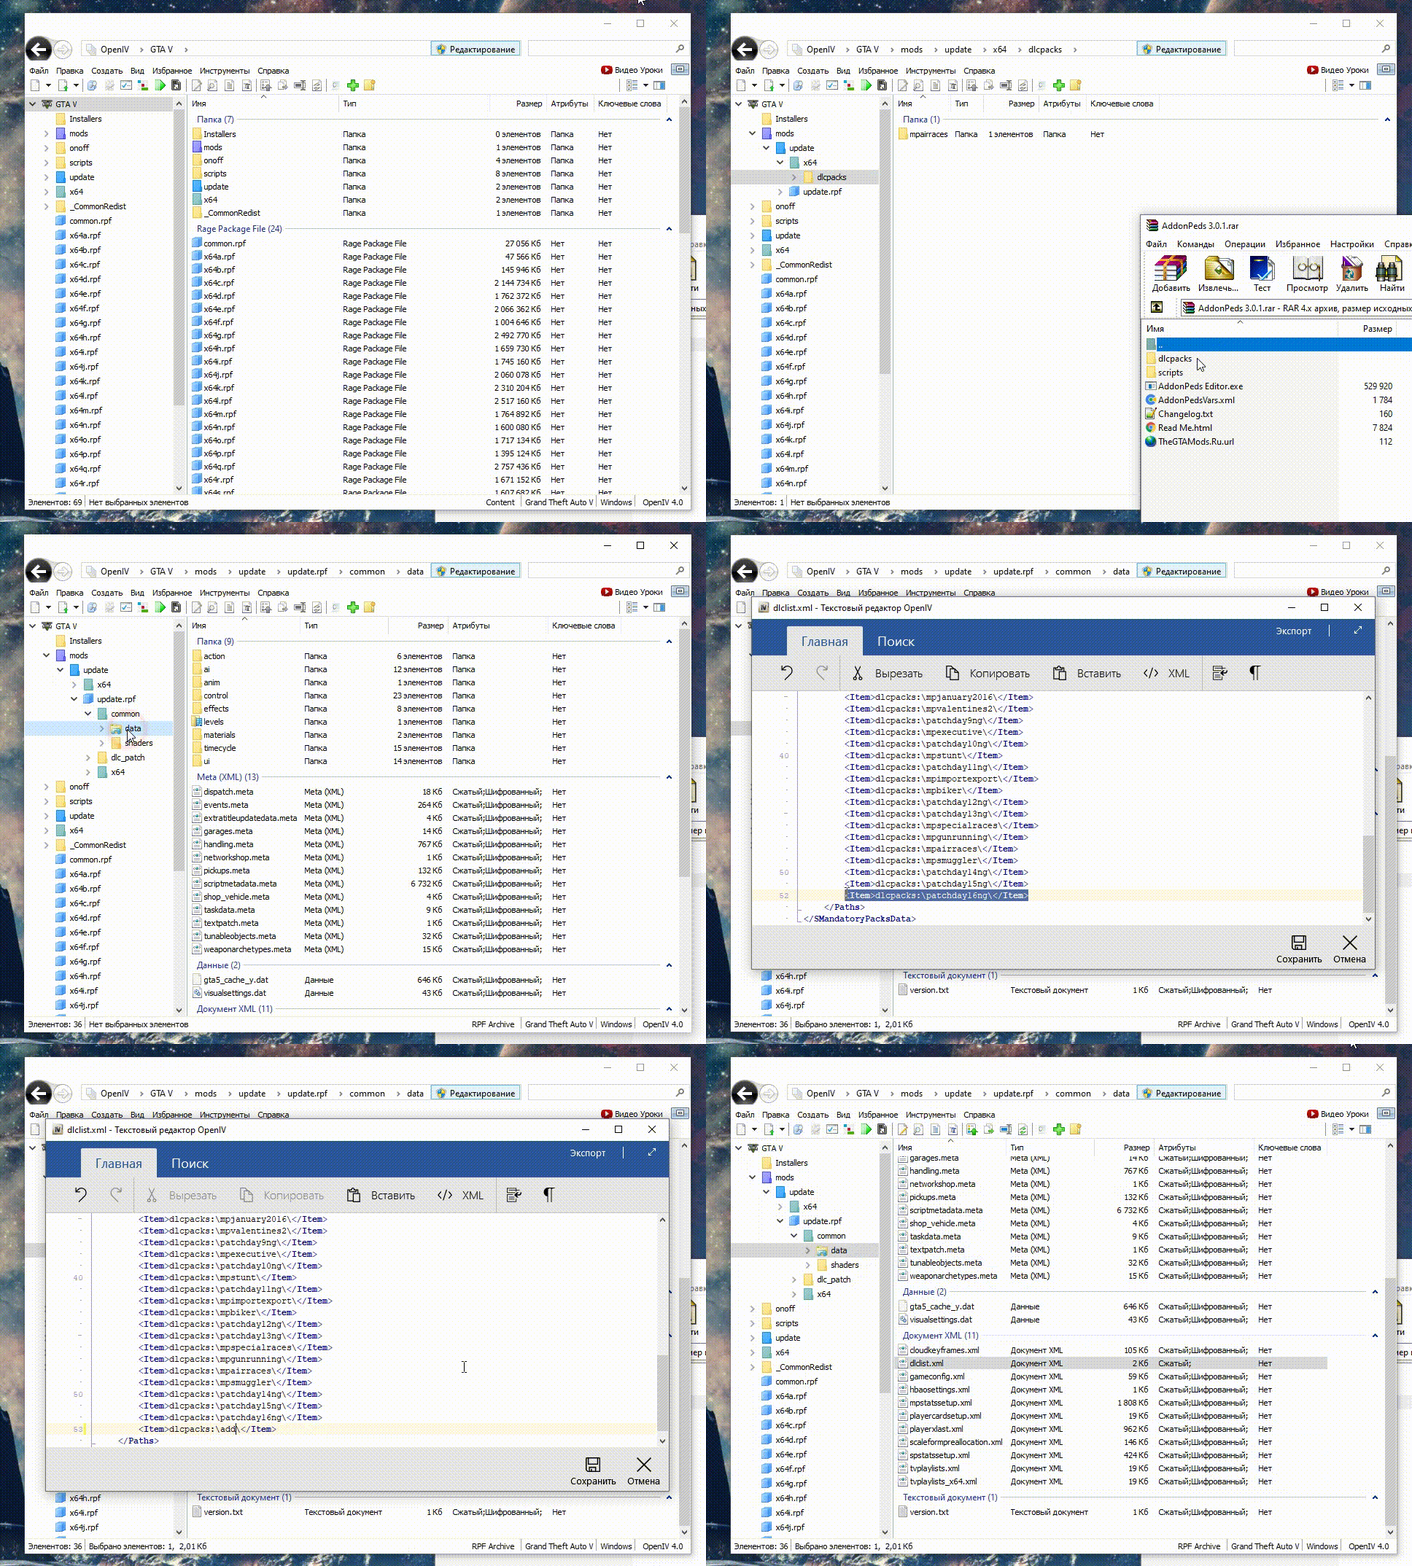
7. Остаётся поместить папку «addonpeds» (в стандартной установке находится в архиве AddonPeds 3.0.1 – dlcpacks) по адресу: mods – update – x64 – dlcpacks и добавить строку dlcpacks:\addonpeds\ в файл по адресу: mods – update.rpf – common – data – dlcpck.xml.
На этом с установками и настройками всё! Поздравляем!
Установка скинов
Теперь речь пойдёт о том, как установить скин в ГТА 5 – после всех первоначальных настроек остаётся только добавлять новых Add-On Ped персонажей и играть за них.
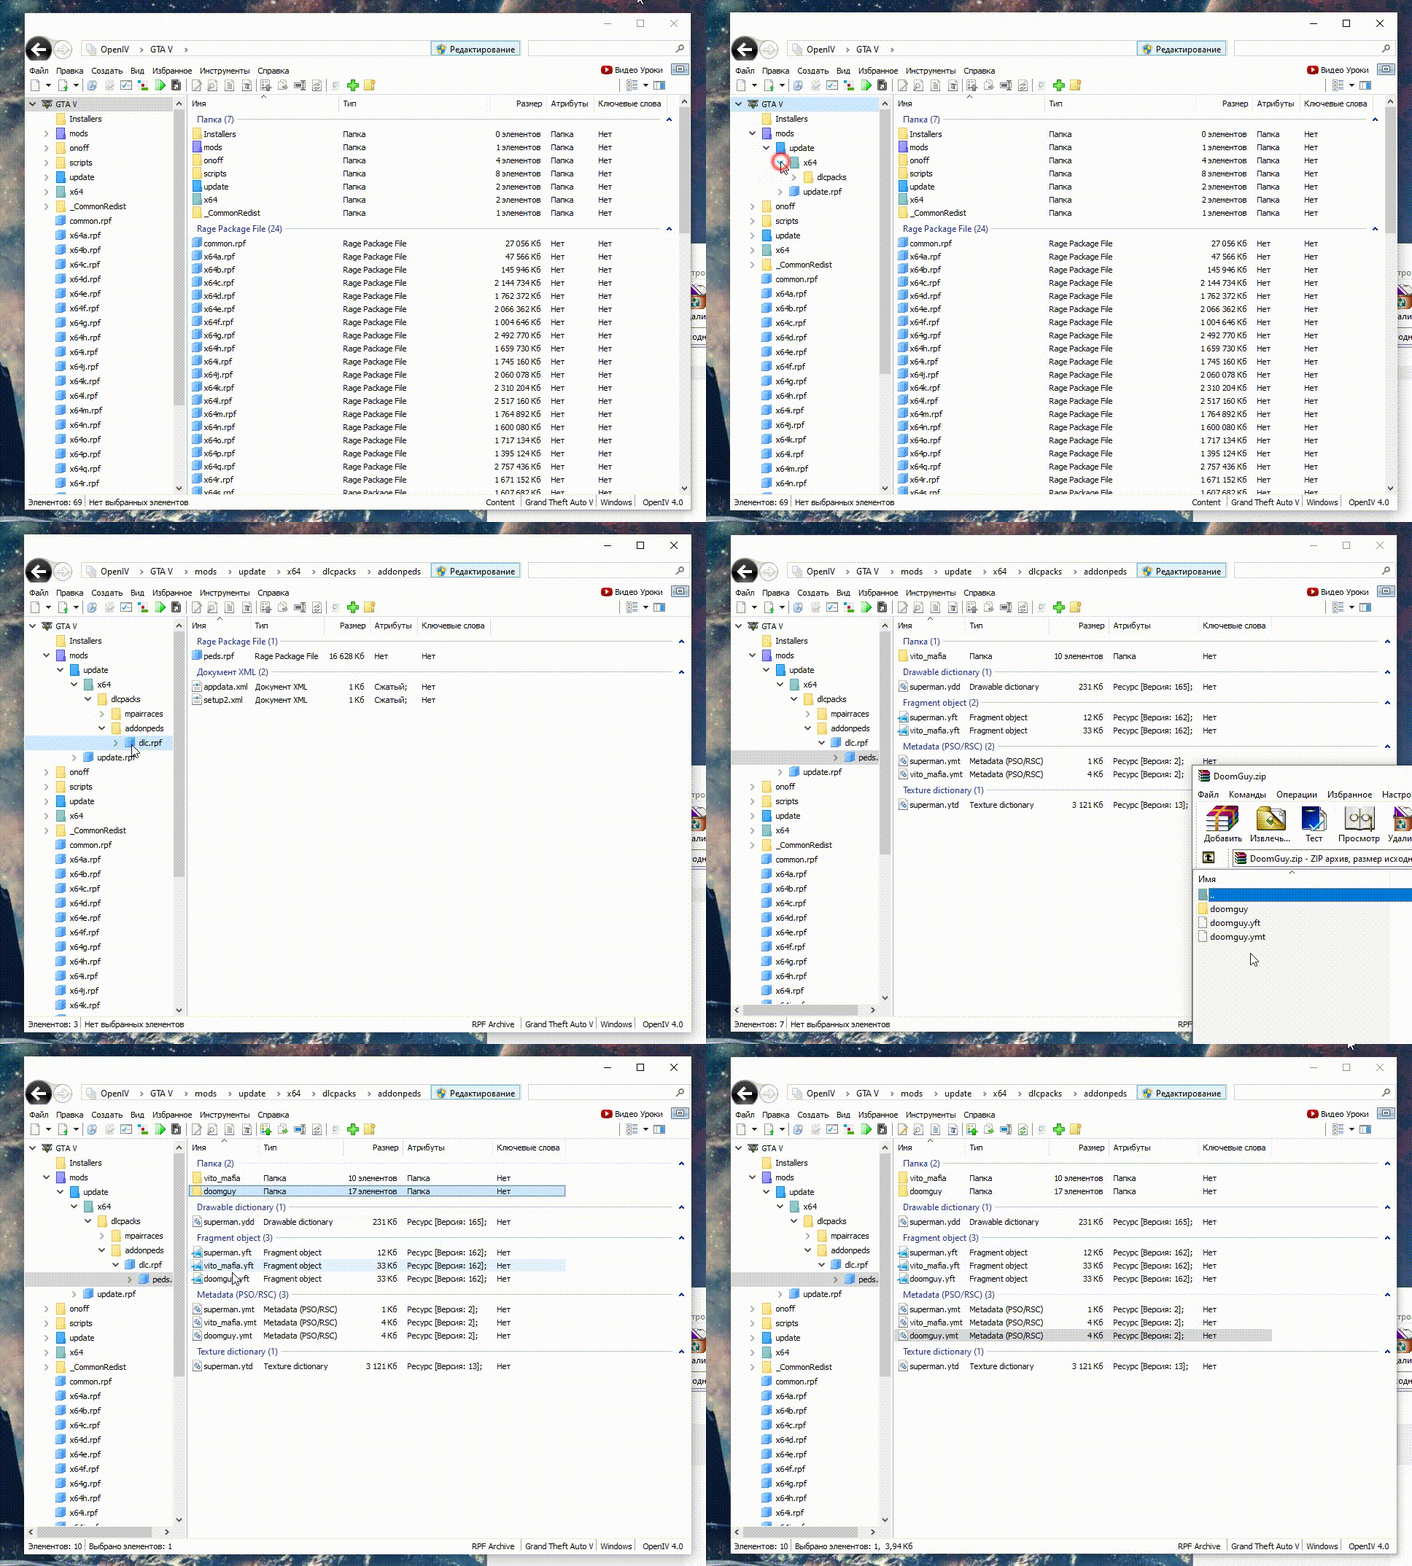
1. Для начала нужно скачать скин, мы для примера возьмём – Doom Guy [Add-On Ped] 1.0.
2. Открываем в OpenIV (не забываем включить режим редактирования) путь, куда нужно копировать файлы скина Addon Peds: mods – update – x64 – dlcpacks – addonpeds – dlc.rpf – peds.rpf
Переносите в открывшееся окошко все файлы и папки скачанного скина, в нашем случае это doomguy.
Теперь можете закрывать программу Опен 4 и нужно проделать ещё несколько небольших действий.
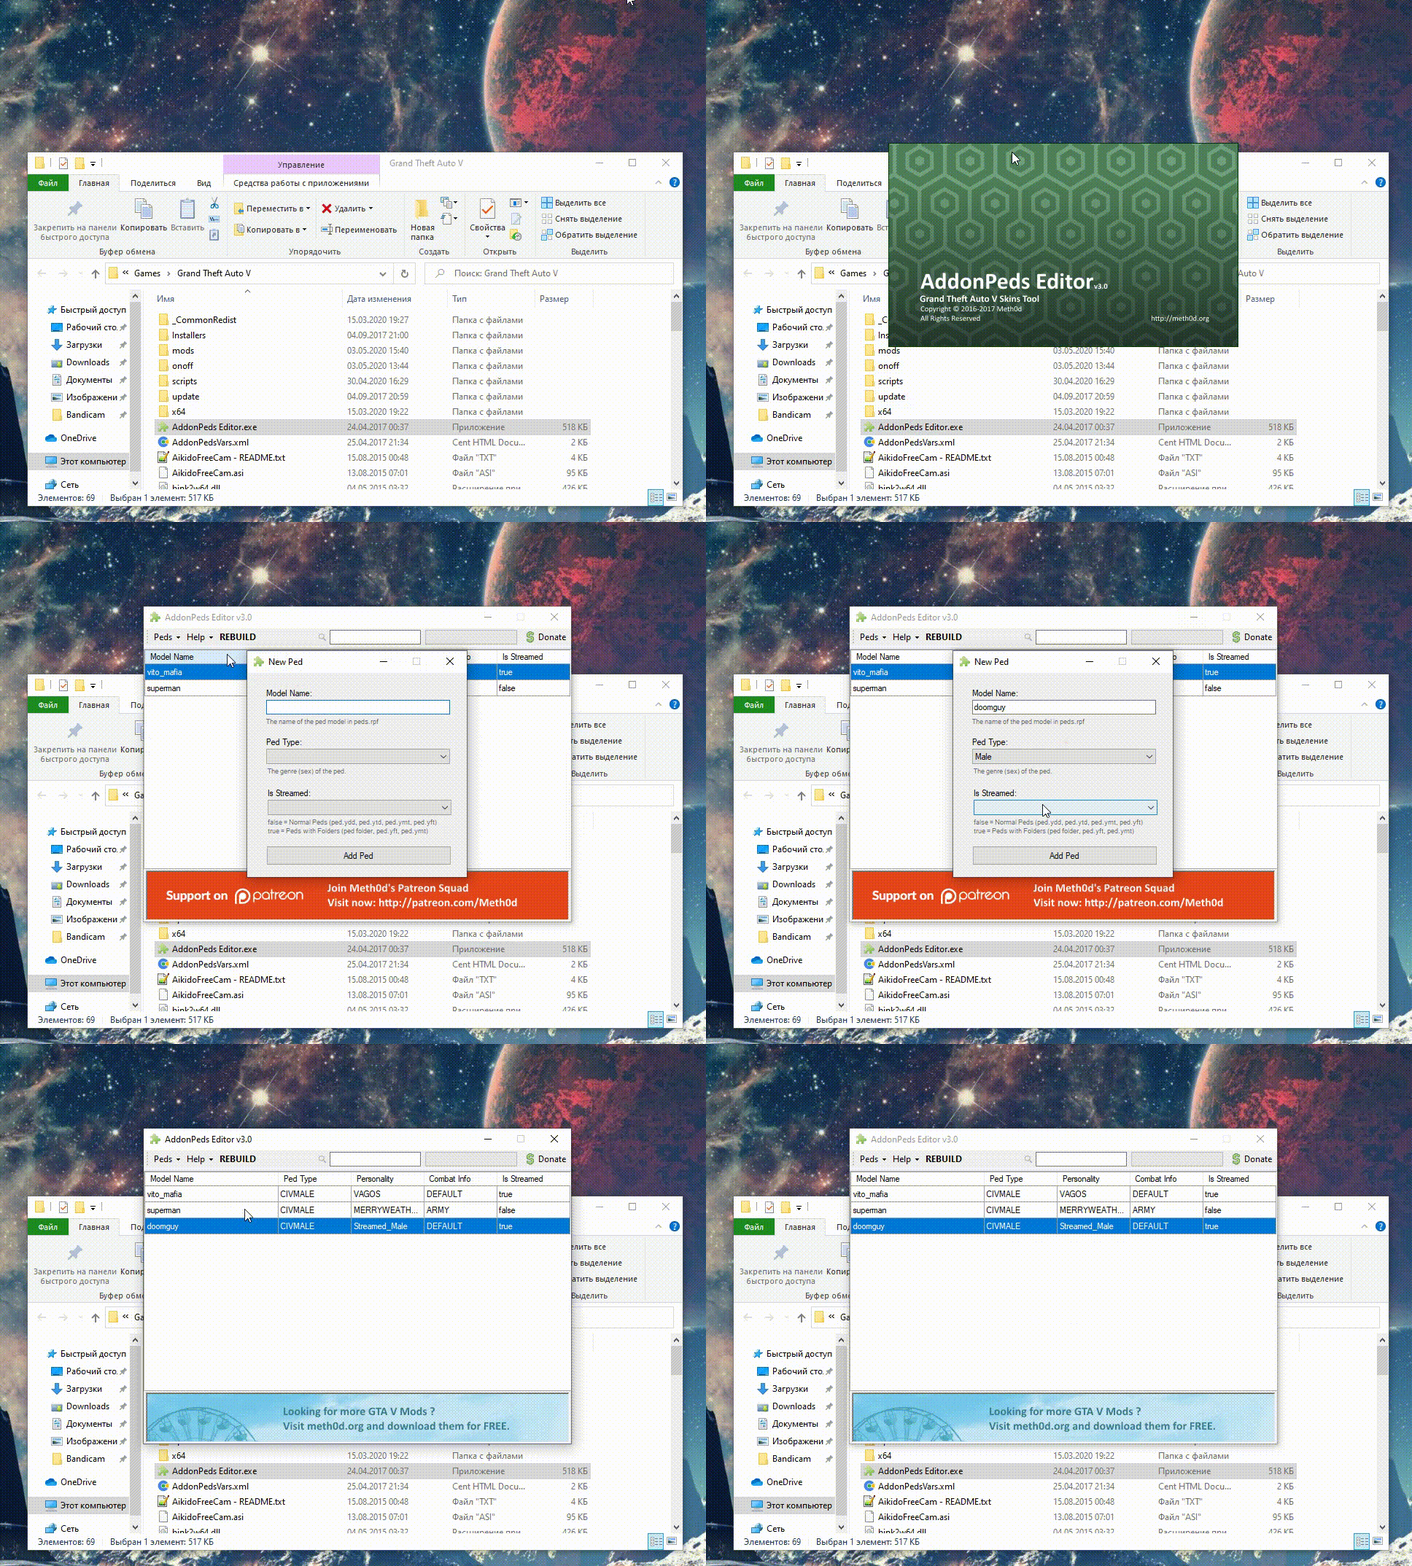
3. Переходите в папку с GTA 5 и запускаете (обязательно от имени Администратора) ранее скопированный в неё файл AddonPeds Editor.exe, откроется окошко, в котором будут отображаться все установленные скины.
4. Теперь нужно прописать добавленный скин, чтобы его можно было выбрать в игре. Жмём Peds – New Ped и появится окошко, в котором нужно заполнить некоторые параметры:
– Model Name: Имя модели, которым назван скин, в нашем случае это doomguy.
– Ped Type: Male/Female (мужчина или женщина).
– Is Streamed: True или false. Если файлы скина имеют папку, то ставьте true, если не имеют, то false. В любом случае, если возникли проблемы, то пробуйте оба варианта.
Когда проделали все действия – жмите кнопку «REBUILD», если не нажать, то скин не появится, потому не забывайте.
На этом всё, Add-On Ped скин установлен, остаётся только выбрать добавленного персонажа в GTA 5.
Как поменять скин в игре
В игре нажмите кнопку L и в открывшемся окошке можно выбрать и включить любой скин, который добавили. После выбора нажимайте Enter.
Вот и всё, надеемся, что у вас всё получилось! А если возникли трудности, то задавайте вопросы в комментариях, возможно именно там будет найдено решение вашей проблемы.
А также предлагаем подписаться на наши группы VK, FB, TG и YOUTUBE канал, перейти на них можно, нажав на специальные кнопки, которые находятся над иконками «поделиться с друзьями». Поделиться также не забывайте, для нас это лучшая благодарность. Спасибо!
Источник
Не открывается ped selector гта 5. Как добавить новую модель в мод AddonPeds
Мод AddonPeds позволяет добавлять свои модели людей в игру, внутри новости я так же покажу как установить мод и как им пользоваться.
Итак, после установки AddonPeds у вас будет специальное меню в котором вы сможете вбирать любую модель любого человека который вы в него добавите, так же стандартно в моде добавлено 2 модели, супермен и Vito из Мафии.
Скриншоты мода AddonPeds:
Как установить мод AddonPeds?
Как добавить новую модель в мод AddonPeds?
The AddonPeds GTA 5 is a mod that allows you to change and add new ped models into your game. Unlike other mods, you do not need to replace any files in the game with AddonPeds. All the information about how to install the mod and tutorials about how to use the mod are included in the download.
Version 3.0 of the AddonPeds
The latest version of the mod AddonPeds menu adds skin, walking animations, combat mode, and personality. There are many other ped settings that you can edit with the mod. Version 3.0 has a new editing software and PedSelector script that makes it easier than before to make these changes to your game.
Why Use the AddonPeds GTA 5 Mod?
The AddonPeds GTA 5 mod is a great option, especially if you are looking to create videos in the game to post online. This mod can also make interactions in the game more interesting, and you can easily change characters on the fly.
Along with creating videos, you can also use the AddonPeds mod to make your own characters in the game. This is great for extending the amount of gameplay that you can get from GTA V. The mod is simple to install, and you can adjust the settings when you are in-game. So, with just a few clicks you can have a whole new character.
AddonPeds requires that you have a copy of GTA 5 installed on your computer. You will need to download AddonPeds and install the program. Along with the main game and the mod, you will need the latest version of Scriphook, NativeUI, and . If you are running any other mods, you most likely will have all the required software installed already. If not, you can easily find all the programs online, so you will just need to install them.
There is only one hotkey that is used in the mod, which is ‘L’. This hotkey will open the Ped Selector Menu, which will have a list of all the skins, personalities, and walking animations that you have installed. You just need to click on the option that you would like to have set, and the mod will make the changes for you.
The Ped Selector menu also allows you to make changes to any model that you have installed or created yourself. This makes it easy to switch out walking animations and personalities while you are still playing the game.
If you have any other mods that use the ‘L’ key, you should change the hotkey. This can be done in the game or mod settings, depending on the other mods that you have installed.
AddonPeds is a great mod that allows you to change your character’s skin, walking animations, personality and so much more with just a few clicks of a button. There is no need to repair files in the game because AddonPeds will change the selected item without repairing any files. AddonPeds is easy to install, and there are tutorials in the files if you need any help with the mod.
Источник
Не работает addon peds gta 5
So I went ahead and installed the basic requirements for GTA 5 mods as instructed in the quick-start guide, and it seems to be working just fine. The built-in trainer seems to be working perfectly, I get no errors, etc. I’m running the latest version of GTA V on Steam, alongside with the latest versions of ScriptHookV, OpenIV and ScriptHookVDotNet.
However, I seem to be struggling in installing/using AddonPeds (the latest version being 3.0.1, as of the day this post was made). It seems that I have installed the mod correctly and followed the Readme by the letter, but custom peds just aren’t showing up when I select them with the L key. In fact, even the ones that seem to come with the mod (Superman and the other one which name escapes me) give me the ‘etc was not located in ped.rpf). I do use the ‘Rebuild’ function (running it in admin mode) after adding the files to the folder in question as well.
I have no idea what I’m doing wrong, as again, I’m following the installation instructions by the letter. I use OpenIV, turn on Edit mode, use ‘Add’ to place the files from the peds in the correct folder, but it still says the ped in question is missing. Bare in mind I’m completely new to GTA 5 modding. Any help?
So, you have increased poolsizes on peds in gameconfig?
Added the Addon peds dlc to dlclist.xml?
Made sure the names in the external tool to load in DLL and meta XML are the same as inside the rpf (so the model name matches the spawn name) ?
» «if you’re packin’ keep it on the lee low»
So I went ahead and installed the basic requirements for GTA 5 mods as instructed in the quick-start guide, and it seems to be working just fine. The built-in trainer seems to be working perfectly, I get no errors, etc. I’m running the latest version of GTA V on Steam, alongside with the latest versions of ScriptHookV, OpenIV and ScriptHookVDotNet.
However, I seem to be struggling in installing/using AddonPeds (the latest version being 3.0.1, as of the day this post was made). It seems that I have installed the mod correctly and followed the Readme by the letter, but custom peds just aren’t showing up when I select them with the L key. In fact, even the ones that seem to come with the mod (Superman and the other one which name escapes me) give me the ‘etc was not located in ped.rpf). I do use the ‘Rebuild’ function (running it in admin mode) after adding the files to the folder in question as well.
I have no idea what I’m doing wrong, as again, I’m following the installation instructions by the letter. I use OpenIV, turn on Edit mode, use ‘Add’ to place the files from the peds in the correct folder, but it still says the ped in question is missing. Bare in mind I’m completely new to GTA 5 modding. Any help?
Make sure you added your new dlclist.xml to the mods folder.
Also, it’s generally not advisable to make external changes to the GTA V dirs while OpenIV is running. I would just close OpenIV, run addonpeds, and reopen OpenIV again to see the results (peds should be there). Then try to spawn them (with the exact same name) in-game.
«Are you having fun? You remember fun? It’s that thing you pretend to have while documenting every moment, meal and faux memory. I’ve got a challenge for you: turn your phone off for a day and see how uncomfortable you get.» — Cara Delevingne
So, you have increased poolsizes on peds in gameconfig?
Added the Addon peds dlc to dlclist.xml?
Made sure the names in the external tool to load in DLL and meta XML are the same as inside the rpf (so the model name matches the spawn name) ?
By «added the Addon peds dlc to dlclist.xml?», do you mean following this part of the Readme?
«*Using a text editor, open dlclist.xml and add the following line before the
And no, I haven’t made any changes in gameconfig. How would one do that? Do I need to download any external tools?
And about naming the ped, well I’m not quite sure. I just made a folder with the name of the ped in question in \update\x64\dlcpacks\addonpeds\dlc.rpf\peds.rpf, dropped the ped files inside that folder, and when using AddonPeds Editor v3.0, I gave it the same name as the folder. Bare in mind, I have also already tried dropping the files as they were in \update\x64\dlcpacks\addonpeds\dlc.rpf\peds.rpf without actually creating a folder first, just in case that’s actually what you have to do, and that didn’t work either.
So I went ahead and installed the basic requirements for GTA 5 mods as instructed in the quick-start guide, and it seems to be working just fine. The built-in trainer seems to be working perfectly, I get no errors, etc. I’m running the latest version of GTA V on Steam, alongside with the latest versions of ScriptHookV, OpenIV and ScriptHookVDotNet.
However, I seem to be struggling in installing/using AddonPeds (the latest version being 3.0.1, as of the day this post was made). It seems that I have installed the mod correctly and followed the Readme by the letter, but custom peds just aren’t showing up when I select them with the L key. In fact, even the ones that seem to come with the mod (Superman and the other one which name escapes me) give me the ‘etc was not located in ped.rpf). I do use the ‘Rebuild’ function (running it in admin mode) after adding the files to the folder in question as well.
I have no idea what I’m doing wrong, as again, I’m following the installation instructions by the letter. I use OpenIV, turn on Edit mode, use ‘Add’ to place the files from the peds in the correct folder, but it still says the ped in question is missing. Bare in mind I’m completely new to GTA 5 modding. Any help?
Make sure you added your new dlclist.xml to the mods folder.
Also, it’s generally not advisable to make external changes to the GTA V dirs while OpenIV is running. I would just close OpenIV, run addonpeds, and reopen OpenIV again to see the results (peds should be there). Then try to spawn them (with the exact same name) in-game.
Yes, the dlclist.xml file is in the mods folder. Though, should it be in /update/x64/dlcpacks/addonpeds folder, or just in the mods folder in itself?
It should go where it always goes, in
mods\update\update.rpf\common\data
As the original game one is in
Any custom gameconfig you may have goes inside said mods data folder too.
«Are you having fun? You remember fun? It’s that thing you pretend to have while documenting every moment, meal and faux memory. I’ve got a challenge for you: turn your phone off for a day and see how uncomfortable you get.» — Cara Delevingne
I just made a folder with the name of the ped in question in \update\x64\dlcpacks\addonpeds\dlc.rpf\peds.rpf
And don’t do that. Put your mods inside your mods folder, aka
mods\update\x64\dlcpacks\addonpeds\
The mods folder is essentially a replica, structure-wise, of your game folders. So, if you needed a modified version of, say, mpapartment, you would copy it into the mods folder too, so as to get:
mods\update\x64\dlcpacks\mpapartment
The mods folder is not really an extra folder, but more of an override folder: anything in the mods folder OpenIV treats as overriding what’s in the original game folders.
«Are you having fun? You remember fun? It’s that thing you pretend to have while documenting every moment, meal and faux memory. I’ve got a challenge for you: turn your phone off for a day and see how uncomfortable you get.» — Cara Delevingne
But I did. I extracted the ped files to /mods/update/x64/dlcpacks/addonpeds/dlc.rpf/peds.rpf, and they’re still not showing up in-game.
But I did. I extracted the ped files to /mods/update/x64/dlcpacks/addonpeds/dlc.rpf/peds.rpf, and they’re still not showing up in-game.
And do you have this extra line in this?
«Are you having fun? You remember fun? It’s that thing you pretend to have while documenting every moment, meal and faux memory. I’ve got a challenge for you: turn your phone off for a day and see how uncomfortable you get.» — Cara Delevingne
@camperstrike Also, it may be due to forum formatting, but you’re missing a backslash:
«Are you having fun? You remember fun? It’s that thing you pretend to have while documenting every moment, meal and faux memory. I’ve got a challenge for you: turn your phone off for a day and see how uncomfortable you get.» — Cara Delevingne
good call, fingers crossed
» «if you’re packin’ keep it on the lee low»
It’s indeed due to bad forum formatting. This is how my dlclist.xml which is in the mods folder looks like:
I have installledd step by step the menu doesnt come on pressing L
Before I download Map Editor, Addon Peds works perfectly fine for me. After I downloaded Map Editor, when I pressed «L», it’s not working! I removed all files from Map editor but it’s just won’t work. Help! I don’t wanna install Addon Peds again!
My addon peds doesnt show any of the peds and I put addon peds and all the required mods all together but when i open the menu and click peds it doesnt show any of them

Hi
So i think i have found a solution for you.
Try this:
Open you OPENIV then select tools from the top,and then select ASI loader.
Check if every program in there is installed, if not, install all of them.
That’s it! I hope it works because mine wasn’t working too and then i tried this and it worked.
@camperstrike I dont know is it still needed,but let me help.
You need to place After
(etc. etc.)
dlcpacks:\addonpeds
Persistence is my greatest strength.
I know this is an old topic, but I got it to work for me. First, make sure that you have NativeUI version 1.7.0, since that is what the last version of PedSelector is looking for. Then, copy NativeUI.dll into the same folder as PedSelector.dll (aka scripts folder). PedSelector.dll and NativeUI.dll must be in the same folder. I hope this helps someone.
@jharingkaye Thanks alot mate, it really helped me out. I can’t believe i’ve been searching for about two weeks for the problem to find out that nativeu.dll has to be in the scripts folder aswell.
Once again cheers mate and you have a blessed day.
ok,i know this is very old now but what i encountered is that i followed everything a tutorial did, everything works out fine until when i get in the game.Yes, my «L» works, the only thing thats not working is the mods, when i select one nothing happens, i tried all of em: vito, superman and other mods and when i select one of them, nothing happens so i cant use a mod
it doesnt work for me any solutions?
So I went ahead and installed the basic requirements for GTA 5 mods as instructed in the quick-start guide, and it seems to be working just fine. The built-in trainer seems to be working perfectly, I get no errors, etc. I’m running the latest version of GTA V on Steam, alongside with the latest versions of ScriptHookV, OpenIV and ScriptHookVDotNet.
However, I seem to be struggling in installing/using AddonPeds (the latest version being 3.0.1, as of the day this post was made). It seems that I have installed the mod correctly and followed the Readme by the letter, but custom peds just aren’t showing up when I select them with the L key. In fact, even the ones that seem to come with the mod (Superman and the other one which name escapes me) give me the ‘etc was not located in ped.rpf). I do use the ‘Rebuild’ function (running it in admin mode) after adding the files to the folder in question as well.
I have no idea what I’m doing wrong, as again, I’m following the installation instructions by the letter. I use OpenIV, turn on Edit mode, use ‘Add’ to place the files from the peds in the correct folder, but it still says the ped in question is missing. Bare in mind I’m completely new to GTA 5 modding. Any help?
I have the solution,
you can’t run ped editor as an administrator, you must click 3 times on Ped Editor.exe and he opens (skip the information window) there you see that the peds have not been added. Add your peds there and click rebuild, you’re done. Run gta 5 and you will see it works
@QK________________ best solution is stop using an outdated mod and use a trainer.
Источник

