- How to configure Management VLAN in Omada SDN Controller (4.4.4 or above)?
- Omada mesh как настроить
- Обзор облачного контроллера TP-Link Omada OC200
- Обзор облачного контроллера TP-Link Omada OC200
- Re: Обзор облачного контроллера TP-Link Omada OC200
- Re: Обзор облачного контроллера TP-Link Omada OC200
- Re: Обзор облачного контроллера TP-Link Omada OC200
- Re: Обзор облачного контроллера TP-Link Omada OC200
- Re: Обзор облачного контроллера TP-Link Omada OC200
- Re: Обзор облачного контроллера TP-Link Omada OC200
- Настройка EAP Контроллера Omada от TP-link
- Описание процесса настройки VPN в Omada SDN на сайте HWP.ru
- How to Build a Mesh Network via Omada EAP in Your Home
How to configure Management VLAN in Omada SDN Controller (4.4.4 or above)?
The management VLAN is a VLAN created to separate the management network from the data network. By default, the management VLAN is the LAN network in a network centrally managed by Omada SDN Controller.
You can change the management VLAN to improve network security. With a separated management VLAN, it is much harder for unauthorized users to modify the configurations or monitor the network.
This article takes two scenarios as examples to introduce how to configure Management VLAN:
- Network with an Omada managed router as the gateway
- Network with a non-Omada managed router as the gateway
- The Omada managed router refers to the TP-Link router that can be managed centrally by Omada SDN Controller, such as ER7206 and ER605.
- Configurations in Omada Hardware Controller and Software Controller are the same. Here we take Omada Software Controller as an example. Before configuring Management VLAN, refer to User Guide to add the devices to the controller, and set up the computer running the controller to obtain an IP address dynamically.
- When using Omada Cloud-Based Controller, you have no need to configure Management VLAN because it has separated the management data from user data to ensure privacy. No user data will pass through the cloud.
Topology 1: Network with an Omada Managed Router as the Gateway

Note: The router can be managed by Omada SDN Controller.
In this scenario, the router, switches, and EAPs can be managed by Omada SDN Controller. After connecting and adding devices, launch the management page and follow the steps below to configure Management VLAN.
1. Go to Settings > Wired Networks > LAN Networks and click Create New LAN to create a network (named MGMT VLAN with VLAN ID 4090 in this example) as Interface. Click the box of associated LAN interface (LAN1), enable DHCP Server, and fill the DHCP range to assign IP addresses to devices in this network. After being created, a profile with the same name will be added automatically, and its PVID is 4090.

2. Go to Devices, click switch A to open the sidebar, and go to Ports. Click the edit icon of an idle port (port 4 in this example) and select a profile whose PVID is 4090.

3. Go to Devices and add the devices to MGMT VLAN (VLAN 4090). You can configure the devices in batches and the steps for switches and EAPs are similar. Take the switch as an example. Click the Gateway/Switches tab, and then Batch Config to select the switches to be configured, and click Edit Selected to open the Properties window. Go to Config > Services, enable Management VLAN, and configure the VLAN as MGMT VLAN (VLAN 4090).


4. Reconnect the controller to switch A through port 4 (the idle port configured in step 2).
Note: Given the Omada Gateway does not support changing the management VLAN temporarily, we will use Omada Discovery Utility to inform the Omada gateway of the new IP address of the Omada Controller.
5. Use another PC connecting to Omada gateway directly to download and install Omada Discovery Utility via this link. Run Omada Discovery Utility, select the Omada gateway and click Batch Setting. Fill in the Controller Hostname/IP with IP address of Omada Controller and the Username/Password of the Omada gateway. At last, click Apply. Given the Omada gateway had been adopted by Omada Controller before, you can find the username/password in Omada Controller Settings > Site > Devices Account.

After configuration, the switches and EAPs will be in the management VLAN (VLAN 4090) with new-assigned IP addresses. The controller can manage and monitor the devices in the separated management VLAN.
Note: We suggest you to set ACL to prevent devices in other networks from accessing the devices in management VLAN, which improves the network security.
Topology 2: Network with a Non-Omada Managed Router as the Gateway

* The router cannot be managed by Omada SDN Controller.
In this scenario, only the switches and EAPs can be managed by Omada SDN Controller. After connecting and adding devices, launch the management page and follow the steps below to configure Management VLAN.
1. Go to Settings > Wired Networks > LAN Networks and click Create New LAN to create a network (named MGMT VLAN with VLAN ID 4090 in this example) as VLAN. After being created, a profile with the same name will be added automatically, and its PVID is 4090.

2. Make sure the devices have obtained IP addresses dynamically or have proper static IP addresses.
- If the devices obtain IP addresses automatically, make sure the DHCP server can assign IP addresses to devices in VLAN 4090.
- If the devices use static IP addresses, note that the controller and devices should be in the same subnet.
3. Go to Devices, click switch A to open the sidebar, and go to Ports. Click the edit icon of an idle port (port 4 in this example) and select a profile whose PVID is 4090.

4. On the same page, go to Devices and add the devices to MGMT VLAN (VLAN 4090). You can configure the devices in batches and the steps for switches and EAPs are similar. Take the switch as an example. Click the Gateway/Switches tab, and then Batch Config to select the switches to be configured, and click Edit Selected to open the Properties window. Go to Config > Services, enable Management VLAN and configure the VLAN as MGMT VLAN (VLAN 4090).


5. Reconnect the controller to switch A through port 4 (the idle port configured in step 3).
After configuration, the switches, EAPs, and controllers will be in the management VLAN (VLAN 4090) with new-assigned IP addresses. The controller can manage and monitor the devices in the separated management VLAN.
To get to know more details of each function and configuration please go to Download Center to download the manual of your product.
Источник
Omada mesh как настроить
Дорогие пользователи! У нас появился новый форум на платформе tp-link.community (Сообщество)
Форум доступен по ссылке https://community.tp-link.com/ru
Просим Вас отнестись с пониманием к новому форуму, он находится в стадии доработки и в скором времени будет полностью завершен.
Если при регистрации в Сообществе Вы укажете адрес электронный почты, который используете на данном форуме, то Ваши данные будут перенесены на форум Сообщества автоматически.
Также, если на форуме Сообщества Ваш никнейм будет занят, то Вам предложат сменить его или оставить, но с приставкой «_RU».
Убедительная просьба не дублировать темы на старом/новом форуме.
Обзор облачного контроллера TP-Link Omada OC200
Обзор облачного контроллера TP-Link Omada OC200
Сообщение Goodwin » 21 май 2019, 14:43
Re: Обзор облачного контроллера TP-Link Omada OC200
Сообщение SergeyBSA31 » 20 июл 2020, 12:16
Re: Обзор облачного контроллера TP-Link Omada OC200
Сообщение Victor_93 » 20 июл 2020, 17:20
Re: Обзор облачного контроллера TP-Link Omada OC200
Сообщение SergeyBSA31 » 20 июл 2020, 20:27
Re: Обзор облачного контроллера TP-Link Omada OC200
Сообщение SergeyBSA31 » 22 июл 2020, 13:00
Re: Обзор облачного контроллера TP-Link Omada OC200
Сообщение Victor_93 » 23 июл 2020, 11:00
Re: Обзор облачного контроллера TP-Link Omada OC200
Сообщение oksana-lubina » 23 июл 2020, 17:43
Источник
Настройка EAP Контроллера Omada от TP-link
В данной инструкции расскажем об использовании Omada Controller от TP-Link в качестве хотспота.
Система wi-fi авторизации гарантированно работает на контроллере версии 3.2.1.
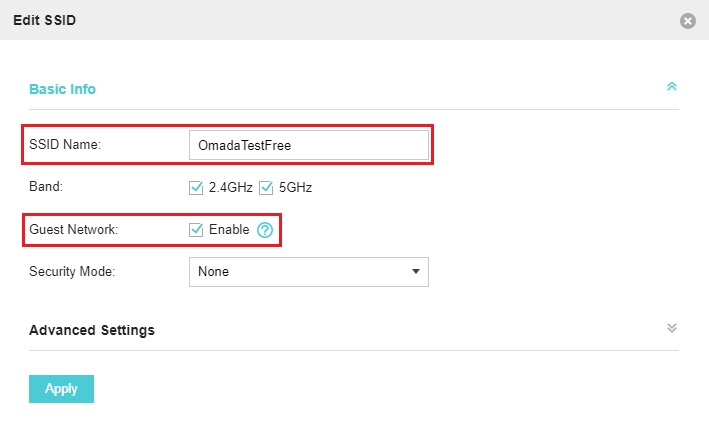
Заходим в настройки контроллера в раздел Wireless Settings — Basic Wireless Setting и добавляем новую сеть. В имени беспроводной сети прописываем NASID хотспота из личного кабинета (обязательно должен совпадать, если хотите изменить название в ЛК — обратитесь к нам в техподдержку).
Если хотите изолировать гостевую сеть, поставьте галочку в параметре Guest Network.
Перейдем в раздел Wireless Control — Portal. Добавим новый портал аутентификации.
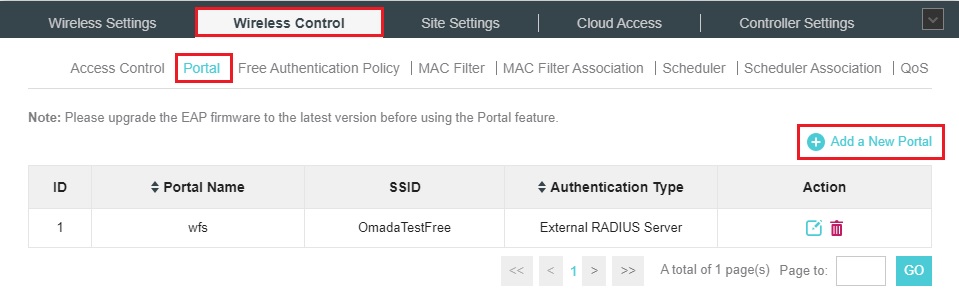
В Portal Name прописываете любое удобное Вам название. В SSID — выбираете созданную на прошлом этапе беспроводную сеть.
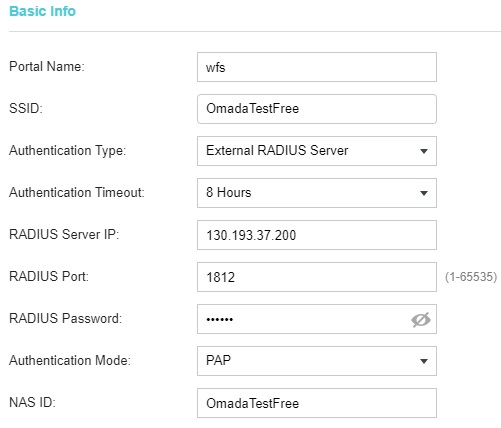
В Authentication Type необходимо задать значение External RADIUS Server.
В RADIUS Server IP задаете адрес 130.193.37.200, RADIUS Password — wfs123.
в NAS ID — nasid вашего хотспота.
Как итог, должны совпадать три параметра: nasid из личного кабинета в нашей системе, SSID и NAS ID на контроллере Omada.
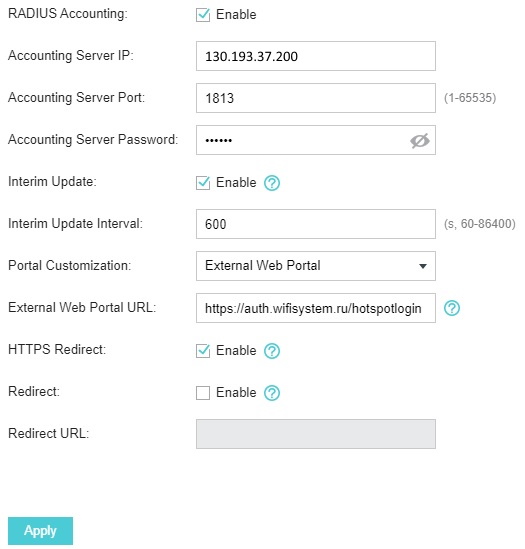
Далее включаем RADIUS Accounting и задаем следующие параметры:
Accounting Server IP — 130.193.37.200
Accounting Server Password — wfs123
А также назначим активным параметр Interim Update, для того, чтобы данные о сессии пользователя, прошедшего wi-fi авторизацию, периодически отправлялись на наш сервер. Выставим интервал в 600.
В качестве Portal Customization задаем External Web Portal и указываем на него ссылку: https://auth.wifisystem.ru/hotspotlogin
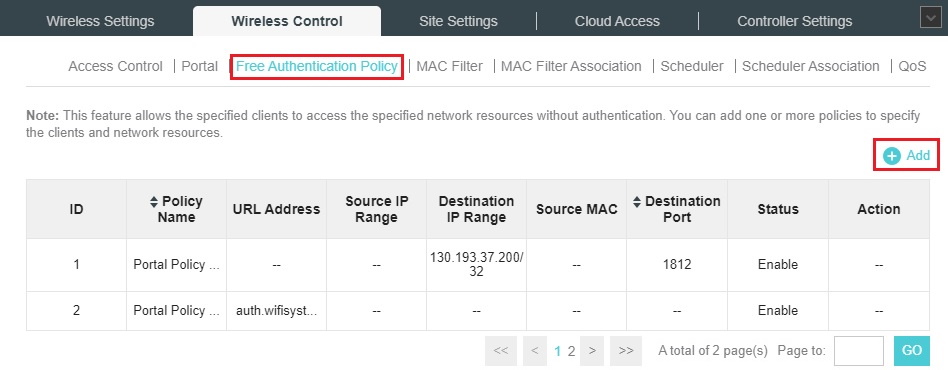
Теперь осталось добавить в белый список наши адреса. В разделе Wireless Control — Free Authentication Policy создаем новые правила:
1. В Match Mode выбираем значение IP-Mac based, в Destination IP Range: 130.193.36.0/22, в Status галочку на Enable.
2. В Match Mode выбираем значение URL и прописываем wifisystem.ru
Настройка контроллера для работы с сервисом авторизации Wi-Fi System завершена. Подождите некоторое время, чтобы точки доступа приняли новые настройки.
В версии контроллера 4 и выше разработчики TPLink зарубили GET запросы, а значит, напрямую общаться наш портал с контроллером omada теперь не может.
Источник
Описание процесса настройки VPN в Omada SDN на сайте HWP.ru
Сайт HWP.ru публикует описание процесса настройки VPN в Omada SDN и делится впечатлениями от использования системы управления Omada. Прочитать статью можно здесь. Также доступен видеообзор:
Подписывайтесь на нас в социальных сетях:
Подписаться на рассылку Мы с ответственностью относимся к вашим персональным данным. Полный текст политики конфиденциальности доступен здесь.
This website uses cookies to improve website navigation, analyze online activities and have the best possible user experience on our website. You can object to the use of cookies at any time. You can find more information in our privacy policy . Don’t show again
This website uses cookies to improve website navigation, analyze online activities and have the best possible user experience on our website. You can object to the use of cookies at any time. You can find more information in our privacy policy . Don’t show again
These cookies are necessary for the website to function and cannot be deactivated in your systems.
Site Selection Popup
SMB Product Selection System
tp_smb-select-product_scence, tp_smb-select-product_scenceSimple, tp_smb-select-product_userChoice, tp_smb-select-product_userChoiceSimple, tp_smb-select-product_userInfo, tp_smb-select-product_userInfoSimple
__livechat, __lc2_cid, __lc2_cst, __lc_cid, __lc_cst, CASID
VISITOR_INFO1_LIVE, YSC, LOGIN_INFO, PREF, CONSENT, __Secure-3PSID, __Secure-3PAPISID, __Secure-3PSIDCC
Analysis and Marketing Cookies
Analysis cookies enable us to analyze your activities on our website in order to improve and adapt the functionality of our website.
The marketing cookies can be set through our website by our advertising partners in order to create a profile of your interests and to show you relevant advertisements on other websites.
Google Analytics & Google Tag Manager & Google Optimize
_gid, _gat, _gat_global, _ga, _gaexp
Google Ads & DoubleClick
NID, IDE, test_cookie, id, 1P_JAR
fr, spin, xs, datr, c_user, sb, _fbp
_ce.s, _CEFT, _gid, cean, _fbp, ceac, _drip_client_9574608, cean_asoc
_hjKB, _fbp, ajs_user_id, _BEAMER_LAST_UPDATE_zeKLgqli17986, _hjid, _gcl_au, _ga, ajs_anonymous_id, _BEAMER_USER_ID_zeKLgqli17986, _hjAbsoluteSessionInProgress, _hjFirstSeen, _hjIncludedInPageviewSample, _hjTLDTest
Hm_lpvt_33178d1a3aad1dcf1c9b345501daa675, Hm_lvt_33178d1a3aad1dcf1c9b345501daa675, HMACCOUNT_BFESS
lms_analytics, AnalyticsSyncHistory, _gcl_au, liap
Источник
How to Build a Mesh Network via Omada EAP in Your Home
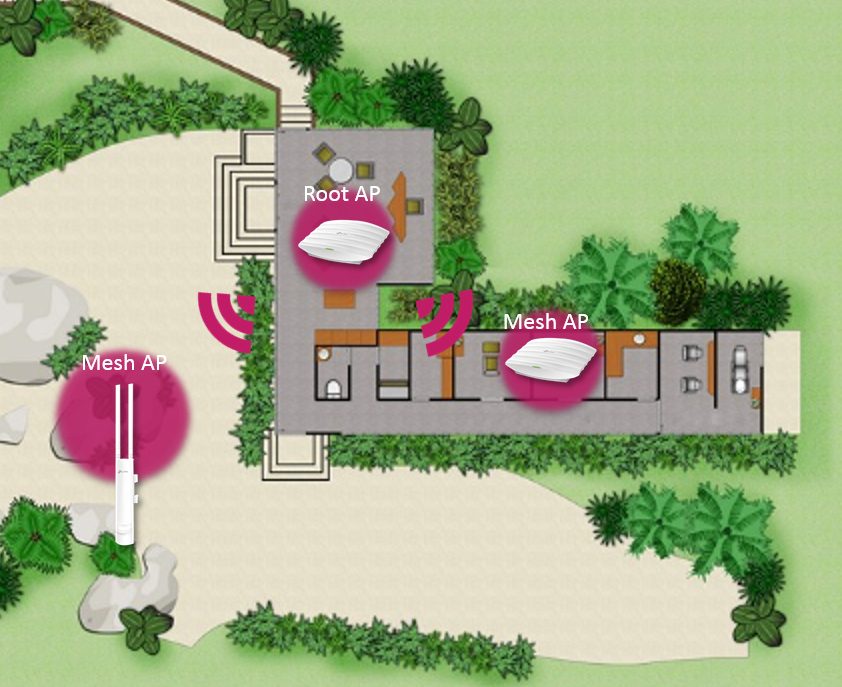
Mesh is used to establishing a wireless network or expand a wired network through a wireless connection on the 5GHz radio band. We can use Omada EAP products to build a mesh network for indoor and outdoor places together.
Here is an example of how to build a Mesh Network in a home scenario via indoor and outdoor Mesh EAP.
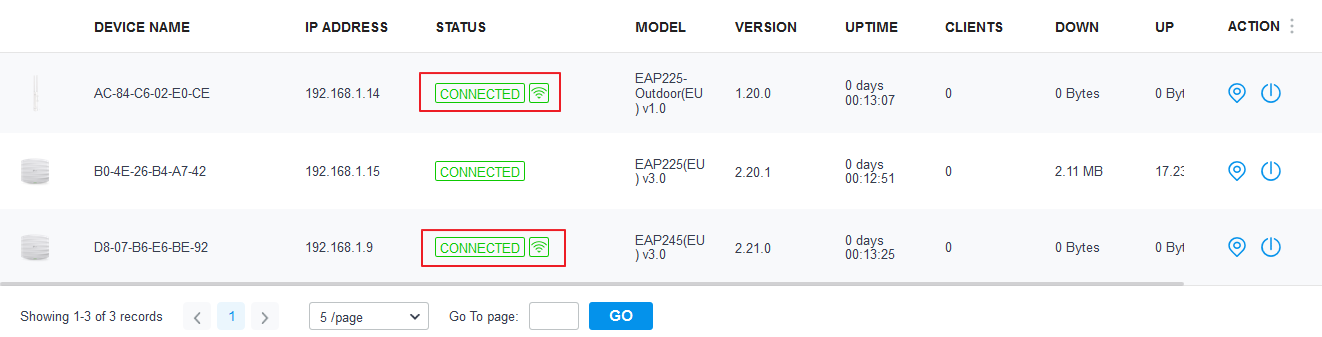
We are using EAP225, EAP245, and EAP225-Outdoor to build the Mesh network. The EAP225 connect with PoE Switch works as the Root AP. The EAP245 and EAP225-Outdoor connect with EAP225 (Root AP) wirelessly as the Mesh AP.
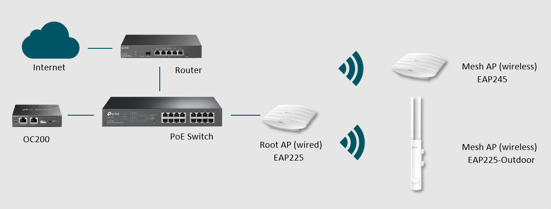
- Following the topology to connect the devices. Power on the EAPs and OC200 (you can also use a software controller) via PoE adapter or PoE switch.
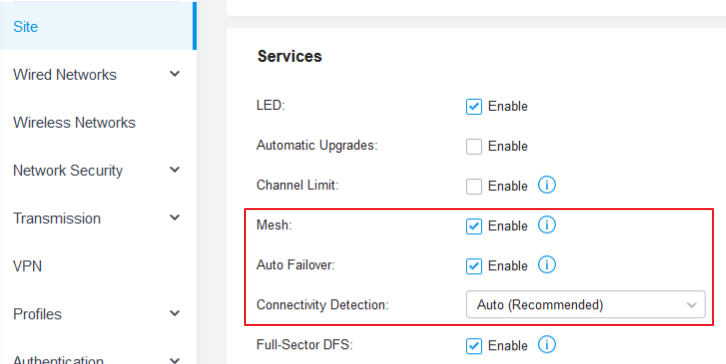
- Use the IP address of OC200 to log in to the management page. Go to Settings-> Site to enable the Mesh function. (It enables by default)
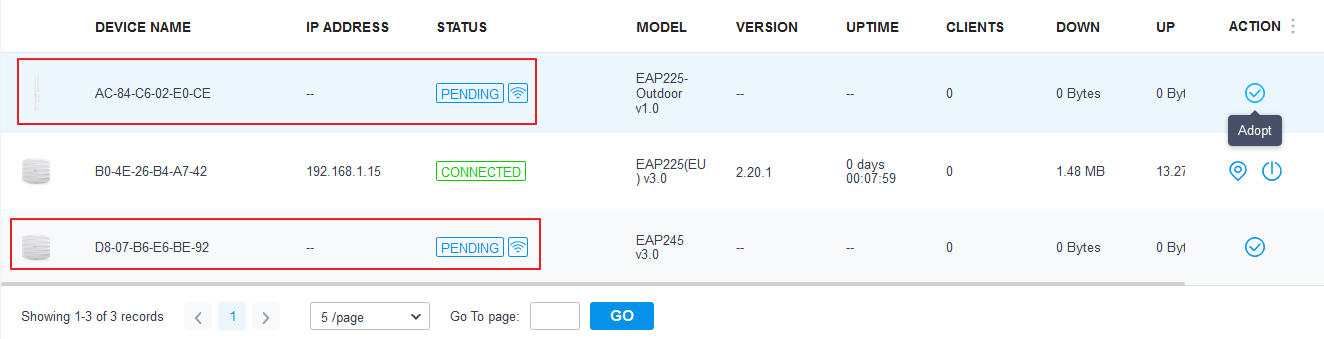
- Go to Device page. And you can find the EAP225 (Root AP) in the pending list. Click the “adopt” button to adopt the EAP225.

- After adopting the EAP225, the Controller will find other wireless EAPs automatically. Click the “adopt” button to adopt the EAP245 and EAP225-Outdoor.
Note: If your EAP225-Outdoor(Canada) isn’t detected by Controller, please check the 5G channel on the root AP and ensure it works on Band4. More details can be found here.
- After 3-5 minutes, the EAP245 and EAP225-Outdoor will get an IP address from DHCP Server and connect with Omada Controller automatically. Just enjoy your Mesh network!
Note: You need to use Omada Controller to configure the Mesh function. The Omada EAP will disable the Mesh function by default if it works in the standalone mode.
Источник