- How to remap mouse buttons with reWASD?
- What to start with?
- Remap mouse buttons to keyboard keys
- Here’s how to remap mouse buttons:
- Make a Rapid Fire mouse macro
- To make a rapid fire mouse macro, follow these steps:
- Mouse shortcuts
- Follow these steps to add shortcuts:
- How to make a mouse macro?
- Make the overlay layout for your mouse with Shift mode
- Add a mouse macro with Activators
- Turn the mouse into a stick
- Here’s how to remap mouse moves to stick:
- Remapping keyboard
- Remapping a standard keyboard
- Remapping a gaming keyboard (with additional programmable buttons)
- Что такое reWASD?
- Как пользоваться reWASD?
- Сколько стоит reWASD?
- Как заставить работать reWASD?
- Как отключить reWASD?
- Ключ Joy бесплатно?
- Можно контроллер для ржавчины использовать?
- Xpadder бесплатный?
- Можете ли вы играть в Valorant с помощью контроллера?
- Как подключить контроллер к моему ПК?
- Как мне настроить DS4Windows?
- Как вы используете JoyToKey?
- Как отключить макросы на клавиатуре?
- Как сделать макрос на клавиатуре?
How to remap mouse buttons with reWASD?
The latest version of reWASD gets the superpowers of a strong mouse macro software: now you can remap mouse buttons to keyboard keys, or controller buttons. This post describes all the tiniest details about making the mouse macro, and about how to remap mouse buttons.
What to start with?
Pick the needed device in the bottom left corner. In this case, you’ll need a mouse or a group of devices that includes a mouse.
Disclaimer for all the gaming mouse owners: if you have a gaming mouse with programmable buttons we suggest checking the reWASD manual about mouse, to know more about this specific case. You need to complete a few more steps to use this mouse macro software in a full swing!
If you pick a group of devices, you will also need to choose Mouse sub-config on the top of the screen.
We insist on using Unmap function for all the mouse keys. Otherwise, the mappings you add can get messed up with the keys on your physical mouse. Also don’t forget that you’ll probably need the basic LMB and RMB clicks for navigation, so consider adding mappings via Activators or Shortcuts, or even adding a Shift layer of mappings to save the native layout.
Now you’re ready to remap!
Here’s the contents, so you could pick the option you’re interested in, and jump to the right place of an article:
Remap mouse buttons to keyboard keys
There’s nothing complicated in this process actually: you change the output you get after you press a certain mouse button, or a combination of ones. reWASD permits to remap mouse buttons to keyboard keys, or to controller buttons if you wish.
Here’s how to remap mouse buttons:
- While the mouse config is chosen, choose the mouse button you want to remap
- Choose the needed mapping from another drop-down list on the right
- To emulate controller with mouse, scroll to the bottom of a list, and then pick the needed controller key
- Add other mappings, press Apply and it’s done!
Make a Rapid Fire mouse macro
Don’t hesitate to make a rapid fire mouse macro, we have two different types of these mappings: Turbo or Toggle.
Turbo allows to activate the mouse macro or a mouse key with the customizable pause between shots.
Toggle permits to imitate the pressed key: you click the button once and the key goes down, you click it once more and the key goes up.
To make a rapid fire mouse macro, follow these steps:
- Choose the mouse key you want to modify: from the main window directly, or from the Additional mouse buttons menu:
Don’t forget to unmap the button, or otherwise the mouse macro software won’t recognize the proper input for Turbo. reWASD will recognize the pressed and held button input, and Turbo with pauses will not work.
Mouse shortcuts
In case you want to leave your regular mouse layout as it is, you can use Shortcuts option, and add the mouse shortcuts that will activate a certain mapping. The shortcut should contain 2, 3 or 4 buttons, and when you press them simultaneously the mappings fires.
Feel free to change the shortcut press time in preferences: the bigger it is, the longer reWASD will wait for you to press all the shortcut activators.
Follow these steps to add shortcuts:
- While the mouse config is chosen, press the Shortcuts icon (that is near the Main configuration)
- Click Add to create the new Shortcut
- Pick the mouse keys that will take part in the shortcut: you need to pick 2, 3 or 4 mouse keys
- Choose what mapping will reproduce when you activate the shortcut
Note, that to use a Toggled mouse macro assigned to the shortcut, you will need to press the shortcut the second time to turn off the Toggled mapping.
How to make a mouse macro?
You won’t find a way to stop me talking about reWASD features, and now it’s time to go to the basics. Our mouse macro software also permits to add a key sequence to the mouse button. Here’s how the combo editor looks like:
If you want to learn everything about the existing functions of the combo editor, we highly recommend to check out the manual about Key Combos.
To create a controller, keyboard or even mouse macro mapped to keyboard key, complete the following steps:
- Choose the mouse button you want to remap
- Pick Key Combo option in the frame on the right side
Note, that we suggest using Unmaps for mouse keys, so the native action did not bother the mapping you have added.
Make the overlay layout for your mouse with Shift mode
Shift mode is a feature that permits to add a layer of mappings that you can activate with a Shift modifier, and use the bindings you have added. Does this sound good to you? Say no more, and follow these steps:
- Choose the Shift 1 icon on the top of reWASD screen
- Pick the button that will serve as Shift modifier. Now you need to define the type: press-and-hold, or toggle. The first one permits to activate the additional layer while the modifier is pressed and held, the second one works like a light switcher: you press it once and the overlay is active, you press it once more and you’re back to the main layer.
Note, that if you create a config for a group of devices, you can choose the Shift modifier from the other device. For example, you create the config for a group that consists of keyboard, controller and mouse, and you set the Toggle Shift modifier to Right Bumper on the controller. Then, you can create a new layout for keyboard and mouse too, and it will be active when you press the Shift modifier on the controller.
Add a mouse macro with Activators
reWASD permits to add double, triple, long activators, and a single press activator, which is a regular reWASD mapping. You can also add start and release press activators, which will reproduce right after a certain button is pressed or released responsively.
Note, that our mouse macro software doesn’t permit to add key sequences to Start and Release press activators, only for single, double, triple and long presses. Check out the manual for Activators to know more about them.
Follow these steps to add a mouse macro to activators:
- Pick the mouse button you want to remap
- Choose the key you want to map the Activator to, and pick the type of Activator you want to assign. You can see all the activators on the top of the frame:
Turn the mouse into a stick
You can easily make the mouse work as a stick, but it usually goes hand-by-hand with using keyboard and mouse as a controller. Also, to make the mouse work as a stick, you’ll need to unmap it, so please check how to work with unmapped mouse.
Here’s how to remap mouse moves to stick:
- While the mouse config is chosen, choose the mouse directions indicated on the image of mouse
- Choose the needed mapping from the frame
- To emulate controller with mouse, unmap the mouse, and this will mute the native behavior
Learn more about remapping mouse moves to the Right stick, and all the Advanced mouse settings that you can tune!
Let us know is we can help you with any questions you may have, and if you have any suggestions concerning this mouse macro software let us know in the comments below. Make sure to follow us on Facebook, Pinterest, and YouTube to keep your hand on the pulse. Also, join our Discord text chat for more fun 🙂
Источник
Remapping keyboard
Remapping a standard keyboard
If you have a standard keyboard without additional buttons or touchpad, follow these steps to remap it:
- Download and install reWASD
- Launch reWASD and make sure that your keyboard is connected to the PC
- Check the lower left corner, choose the keyboard (or a group of devices that includes keyboard) you want to remap on the Device panel
- Create a new profile by clicking the Plus sign at the bottom of the Profile list: set the name of a game, add a background picture if needed, and click Add. The config is created automatically
- Pick Keyboard in the menu on the top of reWASD window
- Press Add button to add the new element to the table
- Add some mappings: choose the key you want to remap on the left, and then add a mapping to it on the right. Repeat until you add all the desired mappings
- Once you’re done, press Save if you want to keep the changes, or press Apply if you want to try the config right away. When you press Apply the config is saved automatically
- Once the config becomes active, you will see Remap is ON in the bottom left corner. To eliminate the active config, press Remap is ON button, and you will see the Remap is OFF indicator. Press it once again to switch remap back ON.
Please note, that reWASD forbids to unmap the following buttons: Right Alt, Right Ctrl, Delete, End, and Enter on the main keyboard. Please consider other keys to remap.
Remapping a gaming keyboard (with additional programmable buttons)
If you have a gaming keyboard with additional programmable buttons or a keyboard with touchpad, it may be reported to reWASD as an unknown device. To initialize and use the keyboard, you need to do the following:
- Download, install reWASD, and also install the native software for your particular keyboard (I have an example with Razer BlackWidow and Synapse 2 software)
Now open the button mapping section in the native software of your keyboard. You need to assign the additional buttons to some buttons, that are not related to the basic keyboard buttons. As an example, I will map M1 to Left mouse button, M2 to Right mouse button, M3 to Scroll click (which is Middle mouse button click), M4 to Mouse Button 4 and M5 to Mouse button 5: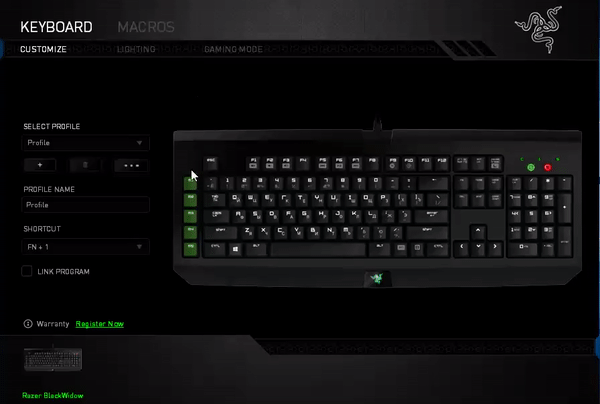
Note, that if you assign, let’s say, Q to M1 in the native software, and map something to Q in reWASD, both M1 and Q on your keyboard will reproduce the way you set in reWASD. That’s why it’s important to map the buttons that do not exist on your physical keyboard to additional buttons, to save the native layout.
Launch reWASD and make sure that your keyboard is connected to PC
Check the lower left corner, find the icon with a question mark and click on it. You will see the following window: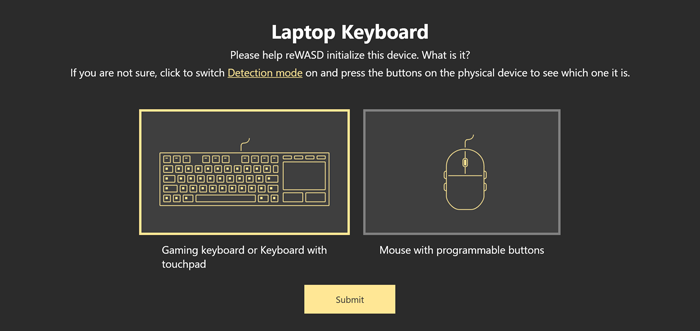
Pick the relevant option, and press Submit. Now you can add mappings to it
Keep in mind, that if remap does not work properly, there is a chance that the keyboard was not initialized properly. You can start from scratch and re-initialize it: open Preferences — General, and click Clear data. Then, make sure to use Detection mode to make a right choice.
Choose the keyboard (or a group of devices that includes keyboard) you want to remap on the Device panel
Now you need to assign the keys from the native software to the desired actions. Don’t forget to Unmap the additional buttons too, to prevent unwanted actions. I will map LMB to G, RMB to H, MMB to J, X1 (which corresponds Mouse Button 4) to K, and X2 (which corresponds Mouse Button 5) to L: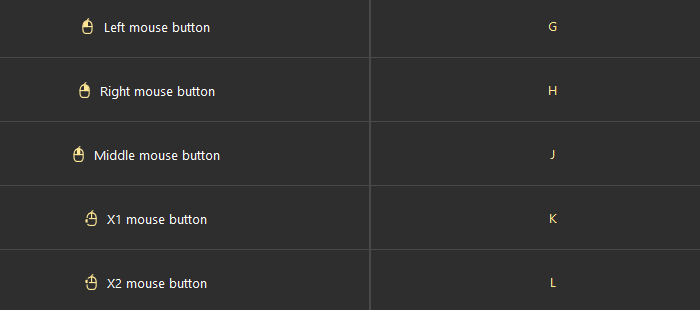
Add some mappings: choose the key you want to remap on the left, and then add a mapping to it on the right. Repeat until you add all the desired mappings
Once you’re done, press Save if you want to keep the changes, or press Apply if you want to try the config right away. When you press Apply the config is saved automatically
Источник
Что такое reWASD?
reWASD дает вам полный контроль над вашими контроллерами Xbox, DualShock и Nintendo. Комбинируя различные настройки, вы можете назначить клавиатуре несколько кнопок геймпада, движения мыши — для направления движения и щелчки мыши — для левого или правого триггера. … Я лично использую его для For Honor с контроллером Xbox One, и это потрясающе!
Как пользоваться reWASD?
Как подключить контроллер Xbox Elite к клавиатуре
- Для начала скачайте и установите reWASD.
- Подключите Xbox Elite к ПК. Запустить reWASD.
- Создайте новый профиль (игру или приложение) и добавьте в него конфиг. Начать переназначение!
Сколько стоит reWASD?
Rewasd может привязать элитные контроллеры Xbox One к чему угодно, в отличие от антимикробной защиты. Вы получаете одну бесплатную пожизненную лицензию. Он отображается в Paypal как плата в размере 6 долларов для меня.
Как заставить работать reWASD?
Вам просто нужно превратить свой физический геймпад в виртуальный контроллер Xbox 360 от reWASD. Вы можете выполнить это действие в два клика. Следуйте за волшебной палочкой под контроллером и выберите нужную кнопку-переключатель. Нажмите «Применить», и теперь Windows и игры видят Xbox вместо DualShock.
Как отключить reWASD?
Чтобы отключить его, откройте Steam Big Picture, затем перейдите в «Настройки», «Настройки контроллера» и удалите отметку с контроллера, который вы используете с reWASD.
Ключ Joy бесплатно?
JoyToKey описывается как «Утилита, которая позволяет игровым контроллерам имитировать ввод с помощью мыши и клавиатуры для всех приложений». Другими замечательными приложениями, такими как JoyToKey, являются USBOverdrive (Freemium), JoyXoff (бесплатно), AntimicroX (бесплатно, с открытым исходным кодом) и Joystick 2 Mouse (бесплатно). …
Можно контроллер для ржавчины использовать?
Если вы похожи на меня и вам также нравится играть в игры с геймпадом, лежа в постели, это для вас. … Просто установите программу, добавьте профиль Rust, нажмите кнопку воспроизведения, чтобы загрузить его, и начните использовать геймпад с Rust.
Xpadder бесплатный?
Xpadder можно загрузить бесплатно. Он работает в 32-битной и 64-битной Windows. Вы можете легко установить это приложение на любую версию Windows.
Можете ли вы играть в Valorant с помощью контроллера?
ДА! Вы можете использовать контроллер, чтобы играть в Valorant. … Это означает, что в игре не будет никакой помощи при прицеливании для пользователей контроллеров, и это огромный ущерб для игры, которая полагается исключительно на точность.
Как подключить контроллер к моему ПК?
На своем ПК нажмите кнопку «Пуск» , затем выберите «Настройки»> «Устройства»> «Bluetooth и другие устройства». Включите Bluetooth. Выберите Добавить Bluetooth или другое устройство> Bluetooth. Ваш компьютер начнет поиск вашего контроллера.
Как мне настроить DS4Windows?
На контроллере PS4 нажмите и удерживайте кнопки PS и Share, пока индикатор не начнет мигать. В настройках Bluetooth должен появиться беспроводной контроллер. Щелкните его и выберите «Сопряжение». Снова откройте приложение DS4Windows.
Как вы используете JoyToKey?
Как пользоваться JoyToKey?
- Запустите JoyToKey.
- На правой панели дважды щелкните строку «Кнопка 1».
- Нажмите клавишу «A», и она будет назначена кнопке, и нажмите «ОК».
- Откройте Блокнот. (ПРИМЕЧАНИЕ: пока НЕ завершайте работу JoyToKey. …
- Пока курсор находится внутри окна Блокнота, нажмите «Кнопку 1» на джойстике. Тогда в Блокноте должен появиться символ «а»!
Как отключить макросы на клавиатуре?
Спасибо. Очень полезно. Есть ли способ отключить несколько макросов с помощью сочетания клавиш (встроенного или нет)? Выберите макросы и нажмите кнопку с галочкой внизу столбца макросов или выберите «Отключить макросы» в меню «Просмотр».
Как сделать макрос на клавиатуре?
Как мне создавать макросы?
- Используя мышь, которую вы хотите настроить, запустите Microsoft Mouse and Keyboard Center.
- В списке под кнопкой, которую вы хотите переназначить, выберите Макрос.
- Щелкните Создать новый макрос. …
- В поле Имя введите имя нового макроса.
- Щелкните в редакторе и введите свой макрос.
Источник