- Скачать Subtitle Edit бесплатно на русском языке
- Обзор Subtitle Edit
- Бесплатные программы на все случаи жизни
- Subtitle Edit — отличная бесплатная программа по редактированию субтитров
- Subtitle Edit — редактор и конвертер более 200 форматов субтитров с открытым исходным кодом
- Subtitle Edit
- Респект за пост! Спасибо за работу!
- Subtitle Edit 3.6 Help
- Mini FAQ
- Help index
- Subtitle Edit main window
- Menu in main window
- Subtitle/file formats
- Frame rate
- Subtitle view — List view or source view
- Text box
- Show video and/or waveform/spectrogram
- Play rate (speed)
- Search
- Find and replace
- Multiple Replace
- Video/wave form modes
- Translate mode
- Create mode
- Adjust mode
- Wave form
- Wave form mouse/keys usage:
- Waveform extraction
- Export
- Synchronization
- Visual sync
- Translation (auto)
- Fix common errors
- Import/OCR image based subtitles — like DVD Sub/idx or Blu-ray sup
- Edit Blu-ray sup/TS-images/BdnXml image based subtitles
- Settings
- Settings — Shortcuts
- Settings — Video player
- Settings — Tools
- Settings — Appearance
- Bookmarks
- Translating Subtitle Edit to another language
- Networking — online collaboration
- Batch convert via UI
- Subtitle Edit command line conversion
- Portable version and VLC
- Make your own plugin
- Subtitle Edit on Linux
- Compiling Subtitle Edit
- Known issues
Скачать Subtitle Edit бесплатно на русском языке
Обзор Subtitle Edit
Subtitle Edit – бесплатное программное обеспечение для редактирования и создания субтитров к видео. Приложение переведено на более 20 языков, в том числе можно скачать бесплатно русскую версию Subtitle Edit. По умолчанию софт устанавливается на английском языке, для переключения локализации нужно настроить соответствующий пункт в настройках.
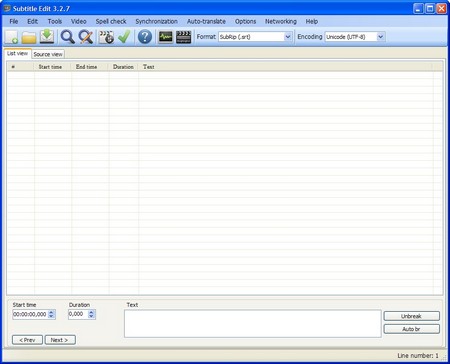
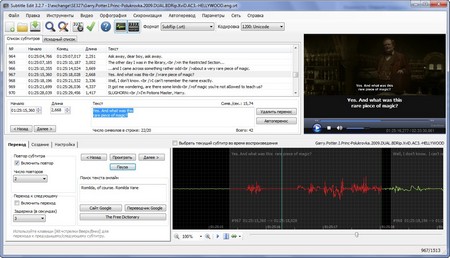
Subtitle Edit работает с различными форматами и показывает информацию о файле Удобное окно редактора позволяет перемещаться по диалогу фраза за фразой и редактировать или удалять любой отрывок. Текст можно просматривать в двух режимах: список субтитров и исходный список. В первом варианте указывается время и длительность каждой фразы, тогда как во втором формате виден только текст и теги.
Одним из преимуществ Subtitle Edit является несколько вариантов автоматического перевода. Программа позволяет переводить фразы, используя поиск либо Google Translate. Можно проверить значения слова в Wikipedia и на сайте The Free Dictionary.
Сабтайтл Эдит также включает в себя: автопереносы строк, визуальная синхронизация, поиск и замена строк, фраз и слов, автоматическая и ручная синхронизация, временной сдвиг. Можно расставить интервалы и ограничить длительность, объединять или разделять строки.
Полезным инструментом является автоматическое создание формы сигнала, при котором извлекаются аудиоданные из видеофайла. Эта функция работает только при установленном плеере VLC и составляет график фраз и аудиоволн.
Источник
Бесплатные программы на все случаи жизни
Subtitle Edit — отличная бесплатная программа по редактированию субтитров
В очередной раз, пытаясь найти интересную и оригинальную бесплатную программу наткнулся на весьма специфический экземпляр, который большинство пользователей не заинтересует, но в определенном кругу должна иметь определенную популярность. Этим приложением оказалось не что иное как весьма мощный редактор субтитров Subtitle Edit. Хочу предупредить, дальше все что написано, это поверхностный обзор непрофессионала, которые несколько десятков минут поэкспериментировал с программой и впервые встречается с приложениями такого типа.
Перед началом инсталляции убедитесь, что у вас на компьютере есть среда исполнения .NET Framework 2.0 или выше, обычно она у всех есть, но может именно в ваш случай редкое исключение из правил. Запустив установку, первым шагом предлагают выбрать язык, на каком будет идти весь процесс установки приятное, что есть русский. Дальше идет стандартный перечень вопросов, лицензионное соглашение, в кукую паку хотим установить и где размещать иконки для запуска. В принципе все можно оставлять по умолчанию, соглашаясь на автомате не вчитываясь.
Прежде всего, в Subtitle Edit, поражает всеядность. Программа понимает более 90 различных форматов субтитров, начиная от привычного srt и кончая выдергиванием (в программе это называется импорт) при необходимости из DVD, Blu-Ray дисков или mkv файлов. Также разбирается во всевозможных кодировках и языках, со всем справляясь в автоматическом режиме, но в клинических случаях можно выбрать вручную.
Запустив программу, видим довольно странное окно, но ничего страшного здесь нет, все сделано довольно просто и понятно, во всяком случае, для людей которые представляют, что такое субтитры и приблизительно догадываются что с ними нужно делать и как создавать. Имеем две вкладки:
— «Исходный список» это субтитры, которые мы загрузили, так как они хранятся в файлах с текстом и разметкой. Теоретически здесь можно все редактировать, но не рекомендую заниматься здесь самодеятельностью, пару цифр и двоеточий в не тех местах потом придется долго искать, в чем проблема.

— «Список субтитров» вот здесь гуляй душа указывает время, когда субтитры должны, появится на экране, продолжительность, ну и конечно самой собой вбиваем текст. Можно вставлять, добавлять, объединять, разбивать строки, добавлять эффекты и стиль написания, даже переводить с одного языка на другой и проверять правописание. В общем, пробуем, экспериментируем, добиваясь нужного результата.
После того как субтитры готово нужно проверить насколько текст совпадает по времени с тем что говорят в кадре. Для это нужно вызвать видеоплеер (иконка в виде «хлопушки» которой хлопают перед началом съемок сцен в фильмах), будем смотреть как текст накладывается на картинку и обычный плеер (выглядит как монитор с нарисованным графиком), где смотрим как, на котором видна звуковая спектрограмма, где хорошо видны по графику, фразы говорящих и паузы. Кстати построение спектрограммы и привязка к ней текста занимает довольно много времени, поэтому можно спокойно запустить этот процесс и выпить чая. Фактически приходиться каждую отдельную фразу просматривать и сравнивать насколько совпадает речь с текстом, при необходимости отдельный такой эпизод можно запускать по кругу.
Чтоб облегчить синхронизацию субтитров с происходящим на экране представляют довольно обширный инструментарий, от простого сдвига всех субтитров вперед/назад на определенный промежуток времени, синхронизации по другим готовым субтитрам с иностранными языками до автоматической по указанным точкам или визуальной когда указываем начальную и конечную сцену после чего программа все сделает автоматически. Это все доступно из пункта главного меню «Синхронизация».
По большому счету удалось упомянуть только часть возможностей, даже не упомянул о встроенном переводчике, возможности распознавания отсканированного теста и групповой работы по сети. Рекомендую все попробовать и подергать своими руками чтоб понять во всем разобраться, не бойтесь ничего смертельного не случиться, в худшем случае можно не сохранять готовый файл.
Настройки позволяет подкрутить много параметров от общих касающихся только субтитров до тонкой настройки интерфейса, горячих клавиш и выбора плеера по умолчанию.
Мне как неискушенному человеку в редактировании субтитров программа Subtitle Edit понравилась все что, нужно на первый взгляд есть под рукой и довольно таки понятно заделано, по названию можно понять, зачем нужен каждый раздел и кнопка. Сначала придется немного поэкспериментировать потратив время, методом проб ошибок разобраться, как все работает. После чего все будет намного легче, будете знать приблизительно, что делать, в какую сторону рыть и логику работы программы.
Все кто хочет проиграться с субтитрами стоит вначале попробовать Subtitle Edit в работе, а потом решать для себя насколько полезная программа.
Единственное что немного раздражает, программа очень долго запускается и немного задумчива при выполнении некоторых операций, нажимаешь кнопку и реакцию видишь только через несколько секунд.
Прекрасно работает в 32-х и 64-х битных операционных системах. Интерфейс переведен на несколько десятков языков, в том числе и русский.
Страница для бесплатного скачивания Subtitle Edit http://www.nikse.dk/SubtitleEdit
Последняя версия на момент написания Subtitle Edit 3.2.7
Размер программы: установочный файл 3,55 Мб
Источник
Subtitle Edit — редактор и конвертер более 200 форматов субтитров с открытым исходным кодом
Субтитры бесценны, когда вы смотрите фильмы на иностранном языке. Знаете ли вы, как создавать или преобразовывать их в другие форматы для различных плееров?

Простой способ сделать это — использовать Subtitle Edit. Это редактор и конвертер субтитров с открытым исходным кодом, который доступен для Windows. Я бы не назвал его удобным для пользователя, но и научиться там не так уж и сложно. Программа поддерживает более 200 форматов субтитров, которые могут быть загружены, и большое количество форматов вывода.
Одной из главных особенностей приложения является то, что оно может воспроизводить видео и субтитры одновременно, так что вы можете довольно легко проверить время, положение текста и другие параметры.

Основные элементы интерфейса Subtitle Edit включают в себя:
- A List View/Source View — Отображает содержание субтитров с временными метками. Здесь можно непосредственно редактировать текстовое содержание, а также задавать время начала и окончания каждой строки.
- A Video preview pane — Воспроизведение видео и отображение субтитров. Вы можете использовать его для проверки синхронизации текста с видео.
- Translate — Вы можете ввести слово или фразу в текстовое поле и кликнуть на нее для поиска нужной фразы. Вы попадете на сайт Google Translate с фразой, предварительно загруженной для перевода. Бесплатный словарь и Википедия расскажут вам больше о том, какое слово вы ищете.
- Create — позволяет добавить новые субтитры в определенное время, а также задать время начала и окончания воспроизведения текста в позиции видео. Регулировка позволяет синхронизировать субтитры с помощью элементов управления, основанных на времени.
- A Waveform — Отображает визуальное представление источника звука, которое может быть полезным (например, для пропуска тихих сцен при редактировании/синхронизации субтитров).

Subtitle Edit позволяет читать, редактировать и конвертировать более 200 форматов субтитров, например:
- SubRip (*.srt)
- ABC iView
- Adobe Encore
- Advanced Sub Station Alpha
- AQTitle
- Avid
- CapMaker Plus (*.cap, binary)
- Captionate
- Cavena890 (*.890, binary)
- Cheetah Caption (*.cap, binary)
- D-Cinema (Cinecanvas, both interop and smpte)
- Dvd Studio Pro
- Dvd Subtitle
- EBU Subtitling data exchange format (*.stl, binary)
- F4 (several variations)
- Flash xml
- Json (two variations, for use with JavaScript)
- MicroDvd
- MPlayer2
- OpenDvt
- PAC (*.pac, binary)
- Pinnacle Impression
- QuickTime Text
- RealTime Text
- Scenarist
- Sony DVD Architect
- Sub Station Alpha
- SubViewer 1.0
- SubViewer 2.0
- Sami (*.smi)
- Son (*.son, import only)
- Subtitle Editor Project
- Timed Text 1.0 (*.xml), also know as TTML or DFXP
- Timed Text Draft (*.xml)
- TMPlayer
- TTXT
- TurboTitle
- Ulead Subtitle Format
- Ultech (*.cap, binary, only read)
- UTX
- WebVTT
- YouTube Annotations
- YouTube Sbv
- Zero G
- Xml
- Csv
- VobSub (*.sub/*.idx, binary — can also be read from Matroska/mp4 files)
- DVD Vob (*.vob, binary, read only)
- Blu-ray sup (*.sup, binary, can also be read from Matroska files)
- Bdn xml (*.xml + png images, read+write)


Subtitle Edit
Вы можете использовать эту программу, или обратиться за помощью в создании или переводе субтитров к профессионалам
Спасибо, что читаете! Подписывайтесь на мои каналы в Telegram, Яндекс.Мессенджере и Яндекс.Дзен. Только там последние обновления блога и новости мира информационных технологий.
Респект за пост! Спасибо за работу!
Хотите больше постов? Узнавать новости технологий? Читать обзоры на гаджеты? Для всего этого, а также для продвижения сайта, покупки нового дизайна и оплаты хостинга, мне необходима помощь от вас, преданные и благодарные читатели. Подробнее о донатах читайте на специальной странице.
Заранее спасибо! Все собранные средства будут пущены на развитие сайта. Поддержка проекта является подарком владельцу сайта.
Источник
Subtitle Edit 3.6 Help
Mini FAQ
Q: When I try to open a video in format «. «, SE cannot play video or there’s no sound. What do I do?
A: Try setting up MPV as your video player.
Also be sure that you have maximized the sound in SE and maximized the sound in Windows.
Q: Is it possible to move a subtitle to the top of the screen?
A: Yes, right-click on selected lines in the list view and choose Alignment. , and then choose e.g. Top center.
You will only see position changes in SE if you use «mpv» as video player — see Options -> Settings -> Video player .
Note: Not all video players/converters will use this positioning.
Q: Where is the delay tool?
A: Use Show earlier/later in the Synchronization menu. Shortcut is Ctrl+Shift+A. It’s a tool window, so you can keep it open while working — or checking subtitle preview in video player.
Q: Why can’t Subtitle Edit change frame rate?
A: Well, it can. Check Synchronization -> Change frame rate.
Q: Why can’t Subtitle Edit split/append subtitles?
A: Try Tools -> Split/append.
Q: Can Subtitle Edit offset times — but not from the very beginning?
A: Yes, you can work with a selection of subtitle lines. Select the lines in the list view you want to work on (hint: click on the first line, then shift+click on the last) and then right-click in the list view (context menu) — now you can adjust the selected lines in «visual sync selected lines» or just «show selected lines earlier/later».
Q: Can Subtitle Edit play video fullscreen?
A: Yes, press ALT+ENTER. Use space for play/pause and ALT+ARROW UP/DOWN for next/previous subtitle.
Q: When translating/editing subtitles, can Subtitle Edit navigate quickly to next line?
A: Yes, press ALT+ARROW UP/DOWN for next previous subtitle — also textbox will keep focus.
Q: Can Subtitle Edit add the subtitles to the video file?
A: No, Subtitle Edit cannot do this — but one or more of the around 300 different output formats should work. Use either File -> Save as. for text based formats or File -> Export. for binary/image-based formats.
There are two ways of adding subtitles into the video file — hardcoding (cannot be turned off ever, so this might be a bad idea) or embedding (only for some formats like mkv, mp4).
Read more about adding subtitles to video or perhaps a tutorial called Using Handbrake to Burn in Subtitles from MKV to MP4 for Apple TV.
Help index
Subtitle Edit main window
Menu in main window
In the menu you can find many tools like change casing, split, append, spell check, synchronization, change frame rate, Google translate, find, replace, remove text for hearing impaired, and much more!
You can import subtitles from Blu-ray sup, transport streams, DVD, vobsub, text and images — even subtitles inside Matroska files can be imported.

NOTE: Many tools are also available via right click in the list view.
The toolbar can use external images. Create a folder called «Icons» (besides the «Dictionaries» and the «Waveforms» folder).
Png files (32×32 pixels) with these names are used if exists: New, Open, Save, SaveAs, Find, Replace, FixCommonErrors, RemoveTextForHi, VisualSync, SpellCheck, Netflix, AssaStyle, AssaProperties, Settings, Help, WaveformToggle, VideoToggle
Subtitle/file formats
 |
In the top menu you can choose format and encoding. The first dropdown list shows subtitle formats. SubRip (extension is «.srt») is the most widely used format today, so it is recommended to save subtitles in this format.
Originally SubRip was a text only format, but in recent years html tags have been common. Especially the italic and font tags are widely used. For a list of SubRip support in players check this out.
File encoding is auto detected in most cases. ANSI is the old, formerly the most common found format, but it requires your system to have a specific culture setting. UTF-8 is recommended for new subtitles, as it can handle non English letters better than ANSI (UTF-8 subtitles will work on all computers no matter what culture settings a computer has), and can display other symbols like music nodes. The only drawback of using UTF-8 is, that some older programs do not support UTF-8.
If you have an ANSI file in another language than the current culture/language (or you have an invalid UTF/Unicode file) then you can use the menu item: File -> Import subtitle with manual chosen encoding.
Import subtitle with manual chosen encoding with preview:

Frame rate
 |
Frame rate is not displayed by default, but you can enable it via the menu Options -> Settings: Toolbar: Show frame rate in toolbar.
Frame rate is used when converting between subtitle formats based on frames and formats based on time. SubRip is based on time. MicroDvd (widely used 7-9 years ago, and still widely used in some countries) is based on frames.
Subtitles based on time is preferred as videos may not have a constant frame rate — which makes working with subtitles based on frames not very flexible at all.
To change the frame rate use Synchronization -> Change frame rate — or use one of the other synchronizations tools.
Subtitle view — List view or source view
There are two ways of looking at a subtitle — list view or source view.
You can switch between list view and source view with the F2 key or via the context menu.
List view is the default. This view is column based and has customizable columns:
The list view gives an excellent overview of the subtitle — the same for all formats.
You can edit text and time codes here, delete and insert lines easily.
To select multiple lines in a block, select the first one, and then on the last line (standard Windows functionality).
is «select all» and is «inverse selection». adds clicked line to selection.
Source view (F2 toggles between source view and list view):
 | This is how the subtitle file actually looks — different for all formats. You can edit text and time codes here, but be careful — it’s easy to mess things up. You can make Subtitle Edit start in Source view under Settings. |


Play rate (speed)
The play rate can be adjusted from a slow 50% to a very fast 300% via the green double arrow in the waveform controls or via shortcuts.
The play rate will not be remembered when re-starting Subtitle Edit.
When the play rate is not 100% (which is normal speed), the green double arrow will have a darker background — like this: 
.

Search
You can search by pressing Ctrl+F (F3 is find next). Regular expression search is available for nerds 😉

Find and replace
You can find and replace by pressing Ctrl+H. Regular expression search is available for nerds 😉
To change something to a new line via the replace string use «\n«.
Multiple Replace
In Edit -> Multiple replace you can create your own rules for fixing a subtitle — even advanced rules using regular expressions!
When writing regular expressions grouping and backreferences are very useful. Parts of a regular expression inside parentheses are groups and can be referenced in the replace string where $1 is a reference to the first group and $2 is a reference to the second and so on.
| Example 1: | ^J( .+) + replace string ♪ $1 | Only the starting «J» will be replaced, so if the text is «J Music Playing J» it will become «♪ Music Playing J» |
| Example 2: | ([a-z]+)(4+) + replace string $2$1 | Two groupings that will be switched, so if the text is «number26» it will become «26number». |
| Example 3: | [.\s\S]*www.addsite.com[.\s\S]* + empty replace string | Will remove any subtitles containing «www.addsite.org» |
| Example 4: | \p + empty replace string | Will remove all Unicode letters (e.g. also Danish letter like æ, ø, and å). \p will match an uppercase letter that has a lowercase variant \p will match a lowercase letter that has an uppercase variant |
| Example 5: | ]*> + empty replace string | Will remove all html tags. |
| Example 6: | \A + replace string | \A will match only first line in each subtitle (unlike ^ that will match all lines). E.g. «Hallo world» will become «<\an8>Hallo world» and «Hallo\r\nworld» will become «<\an8>Hallo\r\nworld». |
| Example 7: | (.+)\n(.+) + replace string $1 | E.g. «Hallo world new-line Bye world» will become «Hallo world». |
You can test/build regular expressions on many web pages, like http://regexstorm.net.
If the result of a replace rule is an empty string, the subtitle will be removed.

Video/wave form modes
Translate mode
![]()
In translate mode you can translate a subtitle from one language to another manually (or correct a machine translated subtitle) while watching the video — and hearing the audio.
If «Auto repeat» is on, then the subtitle will be repeated x-times while you are typing in the correct text.
Use File -> Open original subtitle (translator mode) to also display the original text.
Hint: Do use the for going to previous/next subtitle.
Create mode

This is the place to create subtitle lines from scratch or manually adjust existing lines.
To create subtitle lines from scratch, pause the video file where the subtitle line should start and press the button «Insert new subtitle at video pos». Then enter the text — duration is auto suggested. Now press the button «Play from just before text» and if the text does not start exactly when the speech starts, then adjust «Start time» via the up/down arrows until it does. The duration can be set via the button «Set end time» while the video is playing or via the «Duration up/down arrows.
To insert a subtitle right after the current line, press the Insert button (while the list view is focused).
You can also right click on the audio wave form or in the list view to insert/merge/split/delete lines.
Adjust mode

This is the place to adjust existing lines.
To adjust subtitle lines manually one by one starting from the top. Use the buttons «Set start and offset the rest» (F9) and «Set end & go to next» (F10). Fine-tuning of «Start time» and «Duration» should be done by using the up/down arrows.
You can also right click on the audio wave form or in the list view to insert/merge/split/delete lines.
Wave form
The wave form control makes it easy to see exactly where speech starts/ends.

With the right click menu, you can split/merge/delete subtitles.

To create a new paragraph, make a new selection with the mouse and press Enter
(or right click + choose «Add text here»).

Wave form mouse/keys usage:
- Mouse single click: Go to position
- Mouse double click on existing subtitle: Select clicked subtitle
- Mark area + right click on marked area: Prompt for add new paragraph / play current selection
- Mouse drag left/right border of subtitles (adjusting start or end time)
- Move/drag on middle of subtitle (adjusting both start and end time — but not duration)
- Mouse right click can either add new subtitle or perform delete/split/merge on existing subtitle line
- Mouse wheel scrolls waveform forward/back
- alt+arrow left/right moves video position
- alt+arrow up/down goes previous/next subtitle
- Numeric +/- will zoom in/out
- Mouse single click+Shift will set start for selected line (not moving end time)
- Mouse single click+Ctrl will set end for selected line (not moving start time)
- Mouse single click+Alt will set start for selected line (and keep duration)
- Mouse double click on non-paragraph — toggle play
- Mouse single click+Ctrl+Shift will set of start selected line + offset all lines after selected line (keeping durations)
- Holding down ALT when moving start/end will move nearest subtitle start/end too if it’s closer than 500 milliseconds — like this.
Waveform extraction
The extracting of wave data can be done with FFmpeg (configure in Options — Settings — Waveform) or VLC, and then a very small wave file (with a VERY low samplerate) is generated and saved in the «WaveForms» folder.
Note: You cannot use waveform without the video or the audio.
Export
Subtitle Edit can save via «Save as. » in many different text formats, but if you want to save a subtitle in a binary format (like pac or 890) or an image based format (like png or Blu-ray sup) you must use File -> Export.
Many settings like font, colors and also box style can be chosen.
These tags are preserved when exporting a subtitle to an image based format:
- i — for setting font to italic
- font color — for setting the font color
- — — alignment tags
- ASSA (Advanced Sub Station alpha) or SSA styles like color, font size and box (only ASSA has color alpha/translucency)

Note: Arabic might require «Simple rendering».
Synchronization
 |
| Subtitle Edit offers several ways to synchronize subtitles. |
Adjust all times (show earlier/later): This is useful if you for example need to show all texts 3 seconds earlier.
Visual sync: Sync by matching start/end scene (more below).
Point sync: This allows synchronization by using 2 or more points — sync point time codes can be entered manually which makes it easy to use time codes from another subtitle already in sync.
Point sync via other subtitle: If you have another subtitle in sync (perhaps in another language — it helps if you can understand it a bit) you can match one of the first lines, match one of the last lines, sync, and then all lines should be in sync.
Change frame rate: This makes it easy to match text from a video with one frame rate to a video with another frame rate (can also be done by visual sync or point sync).
Visual sync
 | |
| Visual sync is a really easy way to synchronize a subtitle with a video file. Match one of the first subtitle lines with the start scene. Then match one of the last subtitle lines with the end scene. Press «Sync!» — and that’s it 🙂 There are a few helper buttons which will help find the right place in the video where the subtitle should start (just about where the first word comes out). The «Play 1 sec and back» button is a test button, so you can easily verify that the current position really is correct. Also check the Shortcuts. | |
In some cases a subtitle is impossible to synchronize because one or more scenes have been removed/added. In these cases you can select a number of subtitles in the subtitle list view, right click and choose Visual sync selected lines. This way you can adjust the subtitle in smaller parts.
Translation (auto)
Subtitle Edit can translate a subtitle by using Google translate, Microsoft translator, or Multi Translator (only Swedish to Danish).
Google and Microsoft have translation between a lot of languages! It works fairly well, but translated subtitles will still need manual correction (hint: use main window translate mode).
For Google translate you need to set up a Google Cloud API key (or use the limited free quota) and for Microsoft translate you need to setup an cognitive services ‘Translator Text’ key and be sure to use the correct token endpoint.
Note that if you do get an API key for Google Clould (should look like this) you need to add billing info even for free trial period.
After getting the key, you need to paste it into the «API Key» field for «Google translate» via the menu Options — Settings — Tools.
Also do check the translate plug-ins, see File -> Plugins.
![]()
Fix common errors

Some subtitles have an lot of errors (often these subtitles are created using OCR software).
«Tools -> Fix common errors» provides an easy way to fix a lot of these errors.
The first window shows a list of actions to fix, just tick the check boxes you want fixed and click «Next».

Now you can choose which fixes to apply. Selected fixes are will be remembered in future sessions.
The log tab gives an overview of what will be done — and what was not possible to fix.
The «Apply selected fixes» button applies the fixes.
Many subtitles include text for hearing impaired (also known as «SDH» in the American movie industry which is an initialism for «Subtitles for the deaf or hard-of-hearing»).
For people with perfect hearing (and no noisy kids) these texts can be annoying — and easily removed with Tools -> Remove text for hearing impaired.
SE offers many options for configuring removal of text for HI and in the preview you can see what changes will be made — and skip any wrongly made removals.
You can also remove interjections and you can maintain your own interjections. Interjections are not case sensitive and SE will try to remove them by descending text length.

Spell check uses Hunspell (which is also used by Open/LibraOffice, Firefox, Chrome, and Opera).
Only English dictionary is included, but you can easily find more dictionaries via the toolbar menu Spell check -> Get dictionaries. !
If you download Open Office 3.x dictionaries with the extension .oxt, then rename to .zip, and then unpack the .dic file and the .aff file to the Subtitle Edit Dictionary folder.
The spell check will show this window when it encounters an unknown word:

Edit whole text will enable editing of the whole text (and not only the current word) — for this one sub only.
Change all / Use always will change current word in always — also in future works (saved in the OCR Fix Replace list — take a look at Dictionaries/eng_OCRFixReplaceList.xml to learn more about this file).
Change / Use will change current word just this once.
Add to names/noise list (case sensitive) will remember the name in the edit text box with current casing — also in future works.
Add to user dictionary will remember the word in the edit text box and not prompt for it any more — also in future works. User dictionary is not case sensitive.
All buttons in the «Word not found» groupbox will use the word in the «Word not found» textbox.
Import/OCR image based subtitles — like DVD Sub/idx or Blu-ray sup
If you open an image based subtitle like Blu-ray sup or sub/idx (vobsub) this screen will come up:

The list view now contains empty subtitle text lines with only timestamps. You can enter the text manually, but it’s much easier to let one of the OCR engines do the work:
- OCR via binary image compare (recommended): This option does not require any third party software installed, but it does require the user to manually enter letters based on image parts.
«No of pixels is space» should be decreased if not all translated words are separated (like «wearefine.«), and increased if there are too many separations (like «w e ar e fi n e.«).
OCR via Tesseract 3.02 (recommended): Tesseract is an open source OCR engine.
You can find additional language data files at Github. These Tesseract dictionary files need to be unpacked to [Subtitle Edit folder]\Tesseract302\tessdata.
If you right-click in the list view, you will get a context menu with these options: 
Import text with matching time codes. can be used to continue working on an earlier created subtitle.
Save subtitle image as. allows for saving current image as either pgn, gif, bmp, or tiff.
Save all images with html index display all subtitles images in an html page — for easy proof reading.
OCR via Tesseract will work best if you also have spell check dictionaries. 
prompt for unknown words and Try to guess unknown words will only work if a dictionary is available. Fix OCR errors will also benefit from a dictionary.
If you think Tesseract is too slow, you could set the spell check dictionary to «None» for better performance and then fix errors e.g. via «Fix common errors» plus spell check afterwards.
The prompt for unknown words will look like this (window is re-sizable): 
Edit whole text will enable editing of the whole text (and not only the current word) — for this one sub only.
Change all / Use always will change current word always — also in future works (saved in the OCR Fix Replace list — take a look at Dictionaries/eng_OCRFixReplaceList.xml to learn more about this file).
Change / Use will change current word just this once.
Add to names/noise list (case sensitive) will remember this name with current casing — also in future works.
Add to user dictionary will remember this word and not prompt for it any more — also in future works.
OCR via Tesseract 4.00 (recommended for text without italics or languages not available for Tesseract 3.02): Tesseract is an open source OCR engine.
You can find additional language data files at Github. These Tesseract dictionary files need to be unpacked to [Subtitle Edit folder]\Tesseract4\tessdata.
Tesseract 4 uses a new OCR engine that uses neural network system based on LSTMs.
Note that Tesseract 4 is a bit slower and has limited support for detecting italic font style — but it does bring accuracy gains, especially for smaller/unlcear fonts.
You’ll need to install Visual C++ 2017 runtime to run Tesseract 4 (otherwise SE will complain about a missing VCOMP140.dll file).
OCR via nOCR (recommended for larger subtitles like blu-ray .sup)
You can train nOCR with our own fonts fairly easy/quick.
Select one of the OCR methods and click on the button «Start OCR».
When you are done just click «OK» and do remember that an OCR’ed subtitle most likely contains some errors that need correction.
If a VobSub/TS subtitle contains more than one language, you will be prompted for language.
Edit Blu-ray sup/TS-images/BdnXml image based subtitles
In File — Import — Blu-ray (.sup) subtitle file for edit it’s possible to edit and re-save while keeping existing positions.
You can change color/size/alpha/position/forced/sync/duration of lines/insert and even replace a whole image and much more:

In the preview to the right, you can see subtitles in a black box (the black box only shows the size of the image).
The subtitle preview box can be moved with the mouse or via the position number up/down controls.
In File — Save as. you can save as Blu-ray sup or BdnXml.
Settings
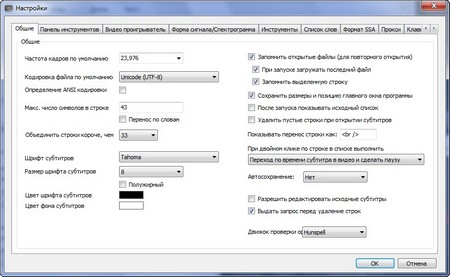
In Settings you can adjust how Subtitle Edit will behave, so it’s pretty important to take a look at these settings — especially single line maximum length and maximum characters per second as these settings will be used throughout all functionality, like «Fix common error» and other tools like syntax coloring in the main window list view (see the «Syntax coloring» settings for adjustments).

The most important rules are grouped in a «Profile» — you can use the default, choose one of the pre-defined profiles, or define your own. 
Settings — Shortcuts
| Window | Control | Shortcuts | Function |
|---|---|---|---|
| Main | * | F1 | Show this help file 😉 |
| Main | * | Ctrl+F (customizable) | Open the Find dialog |
| Main (customizable) | * | F3 | Find next |
| Main | * | Ctrl+z (customizable) | Show history/undo |
| Main | * | Ctrl+G (customizable) | Go to subtitle number dialog |
| Main | * | Ctrl+L (customizable) | Locates (scrolls to) first selected subtitle line in the subtitle list view |
| Main | * | Alt+Arrow up | Go one line up in subtitle list view |
| Main | * | Alt+Arrow down | Go one line down in subtitle list view |
| Main | * | Alt+Insert (customizable) | Insert line after first selected line |
| Main | * | Ctrl+Shift+Insert (customizable) | Insert line before first selected line |
| Main | Subtitle text box | Ctrl+I (customizable) | Make selection italic |
| — | — | — | — |
| Main | Subtitle list view | Ctrl+A | Select all lines |
| Main | Subtitle list view | Ctrl+D | Select only first selected line |
| Main | Subtitle list view | Ctrl+Shift+I | Inverse selection |
| Main | Subtitle list view | Delete | Delete selected lines |
| Main | * | Ctrl+Shift+M (customizable) | Merge selected lines |
| — | — | — | — |
| Main | video player/waveform | Alt+Arrow left (customizable) | Go 0,5 second back in video |
| Main | video player/waveform | Alt+Arrow right (customizable) | Go 0,5 second forward in video |
| Main | video player/waveform | (customizable) | Go 0,1 second back in video |
| Main | video player/waveform | (customizable) | Go 0,1 second forward in video |
| Main | video player/waveform | Ctrl+P | Toggle play/pause video |
| Main | video player/waveform | F9-F12 | Depend on mode (translate/create/adjust) |
| Main | video player/waveform | Alt+1 | Go to start position of current paragraph |
| Main | video player/waveform | Alt+2 | Go to end position of current paragraph |
| Main | video player/waveform | Alt+3 | Go to previous paragraph |
| Main | video player/waveform | Alt+4 | Go to next paragraph |
| Main | video player/waveform — Adjust mode | Ctrl+Space (customizable) | Set start and offset the rest |
| Main | waveform | Ctrl+Scroll wheel | Zoom in/out |
| Main | waveform | Ctrl+Shift+Scroll wheel | Vertical zoom in/out |
| Main | waveform | z | Move 100ms back |
| Main | waveform | x | Move 100ms forward |
| — | — | — | — |
| Spell check | — | Ctrl+G | Google current work |
| Spell check | — | Ctrl+Z | Undo last spell check action |
| — | — | — | — |
| Undocked video player | — | Alt+A | Resize window so video is aspect ratio 1:1 |
| Undocked video player | — | Alt+Enter | Toggle maximized/normal window size |
| — | — | — | — |
| OCR via image compare — Image to text manually | — | Alt+Arrow right | Expand selection |
| OCR via image compare — Image to text manually | — | Alt+Arrow left | Shrink selection |
| OCR via image compare — Image to text manually | — | Alt+i (depends on translation) | Toggle italic |
| OCR via image compare — Image to text manually | — | Alt+f (depends on translation) | Toggle auto-submit (automatically continues after first pressed letter) |
Most of the shortcuts are configurable via Options -> Settings -> Shortcuts (let me know if you need more):

Note: Shortcuts in menus has a stricter validation than hidden shortcuts (e.g. [Shift+N] is not allowed in a menu but is fine for a hidden shortcut).
Settings — Video player
In the «Video player» section you can choose which video player to use inside SE. 
Currently «mpv» is recommended as it has precise seeking and on-video-preview.
Click on «Download mpv lib» to download and use «mpv».
If you have problems downloading mpv via the download button, you can download the file directly from Github.
Download the libmpv64.zip if you have a 64-bit OS.
Unpack the zip file and copy «mpv-1.dll» to the same folder where SubtitleEdit.exe resides.
(You can get cutting edge versions of mpv here: https://sourceforge.net/projects/mpv-player-windows/files/libmpv/)
Settings — Tools
Here you can setup/tweak different tools:

If you often use «Fix common errors» and always use the same fix rules, then enable «Skip step one» to save time.
Often people want to customize line split, so many options are available for this incl. do-not-break-after list.
The «auto br» line split settings are used in «Fix common errors», the main window «Auto br» button, and the list view context menu «Auto balance selected lines».
Note that the «Auto br» button works on selected lines.
Settings — Appearance
Here you can set font and other UI properties for the SE interface. 
Use syntax coloring will enable syntax coloring of html tags and optional spelling errors: 
Dark theme / Dark mode will switch color theme to something like this: 
Bookmarks
You can add a bookmark for a line by activating one of the «Toogle bookmark» shortcuts (see Options — Settings — Shorcuts).
In the «Add bookmark with comment» window you can enter a comment to the bookmark (use Shift+Enter for more than one line).
Bookmarks are saved in a separate file. If you’re working on «video.srt», then SE will save the bookmarks in a file called «Video.srt.SE.bookmarks», so you can actually email both files to other people using SE, and they can also see the bookmarks.

Tip 1: You can right click on the bookmark image left of the text box to get a context menu.
Tip 2: You can double click on the yellow text label to edit the text.
Translating Subtitle Edit to another language
To translate Subtitle Edit first download the English xml language file and save it to your «Subtitle Edit\Languages» folder. Translate the content of all tags with an xml editor or just notepad. You can also use Xml Content Translator!
Save your edited xml file as ‘CultureName’.xml (‘CultureName’ must be an existing culture name — and also a tag in the xml file) in the SubtitleEdit\Languages folder. In Options > Choose language, you can now test your translation by choosing your language as language.
Please do send any translations to me, so I can include them in Subtitle Edit — thx 🙂
Tip 1: WinMerge is an excellent tool for comparing files.
Tip 2: In the About section you can put your email (with «mailto:» before to make a clickable link) or homepage.
Tip 3: The help file tag can point to an url where the help is — keep it blank to just point to the English help file.
The installer can localized by translating this file.
Networking — online collaboration
If you and a few friends want to translate the same subtitle at the same time over the internet, then do try the «Networking» feature.
First load the subtitle you want translated (and optionally the original subtitle). Then choose «Start new session» in the «Networking» menu:

The «session key» is your subtitle id (can be any text you like) — other people need this in order to join (via menu Networking -> Join session) your session.
The «username» will be displayed when updating/inserting/deleting lines and in the chat window
The «webservice url» points to a small server program hosting the session (I initially developed this via direct p2p, but decided to use a webservice instead, as it works much better with stuff like firewalls). Source code for this webservice is available and should make it easy to use your own server for hosting the networking session.
Subtitle Edit running in networking mode below. In the «User/action» column in the list view you can follow the translation progress — this might sparkle some synergistic effect!

Batch convert via UI
Batch convert is accessible via Tools -> Batch convert. or you can start the batch convert directly via SubtitleEdit /batchconvertui
Batch convert is a powerful tool that can convert between 300 different subtitle formats with a lot of options.
Many formats can also be read from mkv/mp4/ts/m2ts files.
Some of the batch convert options have their own settings, e.g. «Merge short lines». To show the settings for «Merge short lines», the list box line with the «Merge short lines» option should be selected like below (note: it’s not enough to click on the check box, a click on the text is needed).
Transport streams (.ts/.m2ts) can only be converted to Blu-ray sup files — check the TS settings if you want to resize or do re-positioning.

Subtitle Edit command line conversion
Subtitle Edit can do command line conversion between formats listed in the main window format drop down list.
Syntax: SubtitleEdit /convert «pattern» «name-of-format-without-spaces» [/encoding:?] [/fps:?] [/outputfolder:?]:
Result: Will convert sub1.srt to sub1.sub to SAMI format
Result: Will convert all .srt files to Adobe Encore format
Result: Same as above but using windows-1252 file encoding (see Info.Name list for more encodings)
Result: Converts frame based a.sub to time based a.srt via a frame rate of 25
Result: Converts a.sub to C:\Temp\a.srt
Result: Converts a.sub to a.txt in a custom format named «MyFormat»
To list supported formats:
Result: Show the more than 200 supported formats in command line conversion!
Portable version and VLC
To use Subtitle Edit portable with VLC portable, download VLC portable (at least version 1.1.0, like VLC 3.0.8 64-bit or VLC 3.0.8 32-bit).
Now you can unpack to a sub folder in the Subtitle Edit folder called «VLC» or go to Options -> Settings -> Video player and browse to VLC portable version.
Note: You need VLC 64-bit on 64-bit operating systems, and VLC 32-bit on 32-bit operating systems.
Make your own plugin
If you can code C# or VB.net you can make your own plugins for SE (SE 3.3 and later).
You can visit the GitHub plugin page for more information and download.
«Haxor» is a very very basic example.
«Fix Hyphens» is a more complete example with a form and some basic helper classes.
At the moment it is possible to use plugins here: File, Tools, Sync, Translate, and «Spell check».
Compile to «Any CPU» and not x86 or x64.
Subtitle Edit on Linux
Even though Subtitle Edit is a Windows program, it runs (mostly) well on Linux via Mono.

Download the portable version of SE (and not the installer).
Packages required for Ubuntu based distros:
- sudo apt-get install mono-complete
- sudo apt-get install libhunspell-dev
- sudo apt-get install libmpv-dev (libmpv.so)
- sudo apt-get install tesseract-ocr
- sudo apt-get install vlc (already installed on some distros, SE uses (libvlc.so))
- sudo apt-get install ffmpeg (already installed on some distros)
Packages required for Arch based distros (like Manjaro):
- sudo pacman -S mono
- sudo pacman -S mpv
- sudo pacman -S hunspell
- sudo pacman -S ttf-dejavu (Unicode font)
- sudo pacman -S tesseract
- sudo pacman -S tesseract-data-eng (or install via «sudo mono SubtitleEdit.exe»)
After unpacking SE and installing the packages, you can run SE by double clicking on «SubtitleEdit.exe» or run «mono SubtitleEdit.exe» in a terminal.
(The «Tesseract302» folder and the two hunspell dll files can be deleted as they are for Windows only.)
Tesseract languages must be install via a package — e.g. on Ubuntu «sudo apt-get install tesseract-ocr-eng».
Note that these lib are required (a symlink file may be needed): libc.so.6, libdl.so (libdl.so.2 in SE 3.5.16) Adding a missing symlink for libvlc could look like this: sudo ln -s /usr/lib/x86_64-linux-gnu/libvlc.so.5.6.0
Known issues:
- Setting focus on a control programatically does not work
- The letter è (and some other Unicode characters) will crash SE — read more in this Github issue
- Some languages like Chinese or Arabic might require a different font.
- Text to bitmap rendering is not working well. In image exporting try «Simple rendering» if you have problems.
- Winforms layout.
Compiling Subtitle Edit
Compiling your own version of Subtitle Edit is not that hard 🙂
If you don’t have MS Visual Studio, then download and install MS Visual Studio Community. Then download the Subtitle Edit source code and edit the file «SubtitleEdit.csproj» and remove the following line:
Open «SubtitleEdit.csproj» in Visual Studio, go to Tools -> NuGet Packet Manager -> Manage NuGet packages for Solution. — and click «Restore» (this will download required components).
Hit F5 and you should be up and running.
Now you can change/add features you want or fix my bugs — if there were any 😉
Known issues
Subtitle Edit has a few known problems!
| Problem | Solution |
|---|---|
| Subtitle Edit does not detect VLC in options (it’s grayed out) | SE requires VLC 64-bit version on 64-bit operating systems (use VLC 32-bit on 32-bit operating systems) |
| Subtitle Edit portable is not working properly in «Program files» folder | Use the installer if you want to have Subtitle Edit in «Program files» (remove portable version before) |
| Tesseract 3.0.2 will not run properly. | If you have used the Tesseract installer, then uninstall it. After uninstalling the Tesseract installer, you must still remove the environment variable «TESSDATA_PREFIX» (e.g. like this). Also, you might need the Microsoft Visual C++ 2008 Redistributable Package: https://www.microsoft.com/en-us/download/details.aspx?id=29 If it still don’t work, try to delete both «C:\Program files (x86)\Subtitle Edit» and «C:\Users\[Username]\App Data\Roaming\SubtitleEdit» before re-installing. |
| Subtitle Edit fails to run from a network drive («The publisher could not be verified») | If you do not have sufficient access to run Subtitle Edit from a network drive, then copy it to your local hard disk or obtain the needed access |
Did you not find what you were looking for? Feel free to email me.
Источник