- Как настроить VS Code для разработки на PHP
- Основные возможности
- EditorConfig for VS Code
- PHP Intelephense
- PHP Debug
- PHP Sniffer
- Semicolon Insertion Shortcut
- Extra
- PHP in Visual Studio Code
- Linting
- Windows:
- Linux and macOS:
- Snippets
- PHP extensions
- Disable built-in PHP support
- Debugging
- Next steps
- IntelliSense
- IntelliSense for your programming language
- IntelliSense features
- Types of completions
- Customizing IntelliSense
- Settings
- Tab Completion
- Locality Bonus
- Suggestion selection
- Snippets in suggestions
- Key bindings
- Troubleshooting
- Next steps
- Common questions
- Why am I not getting any suggestions?
- Why am I not seeing method and variable suggestions?
Как настроить VS Code для разработки на PHP
Visual Studio Code – популярный бесплатный редактор кода. Может с легкостью конкурировать с PhpStorm, ведь он бесплатный и с открытым исходным кодом
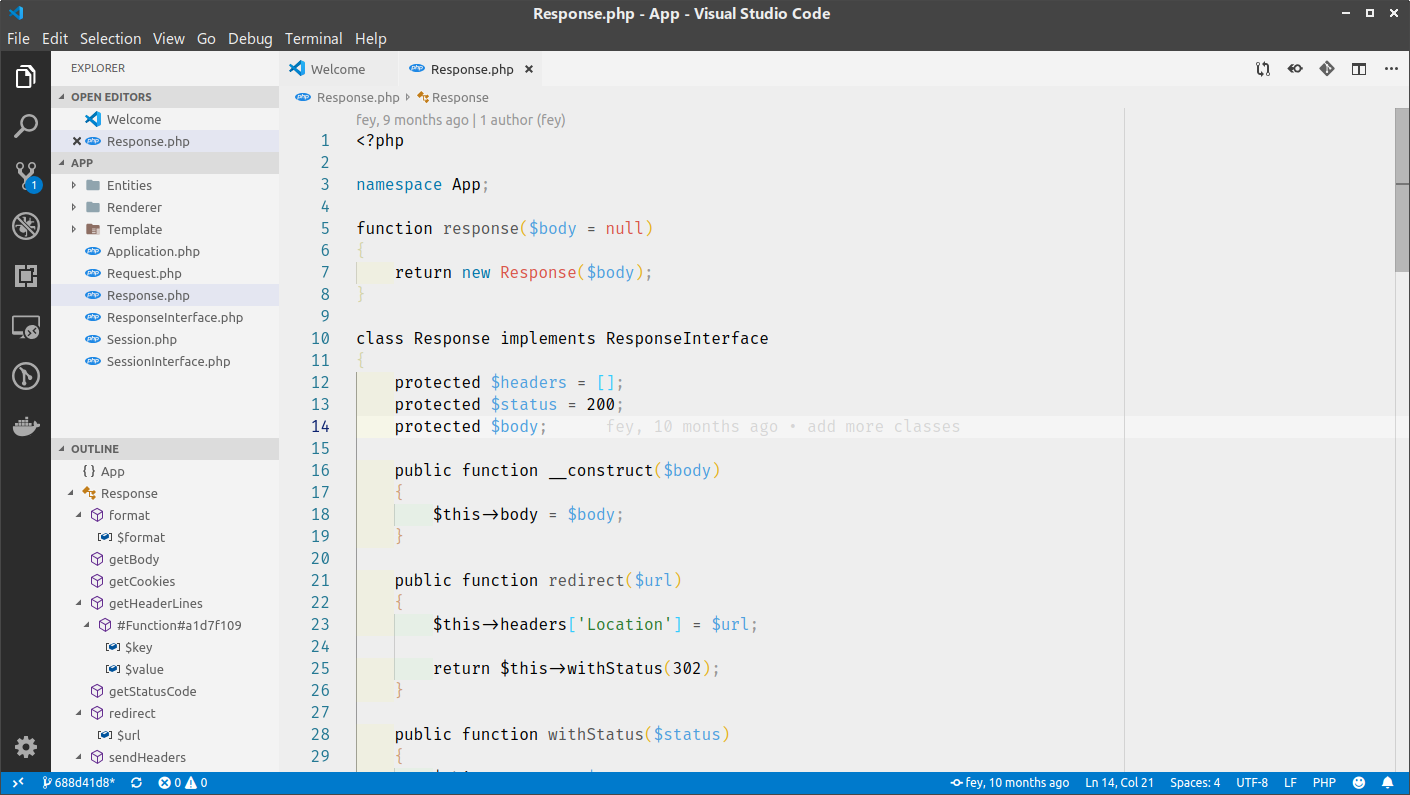
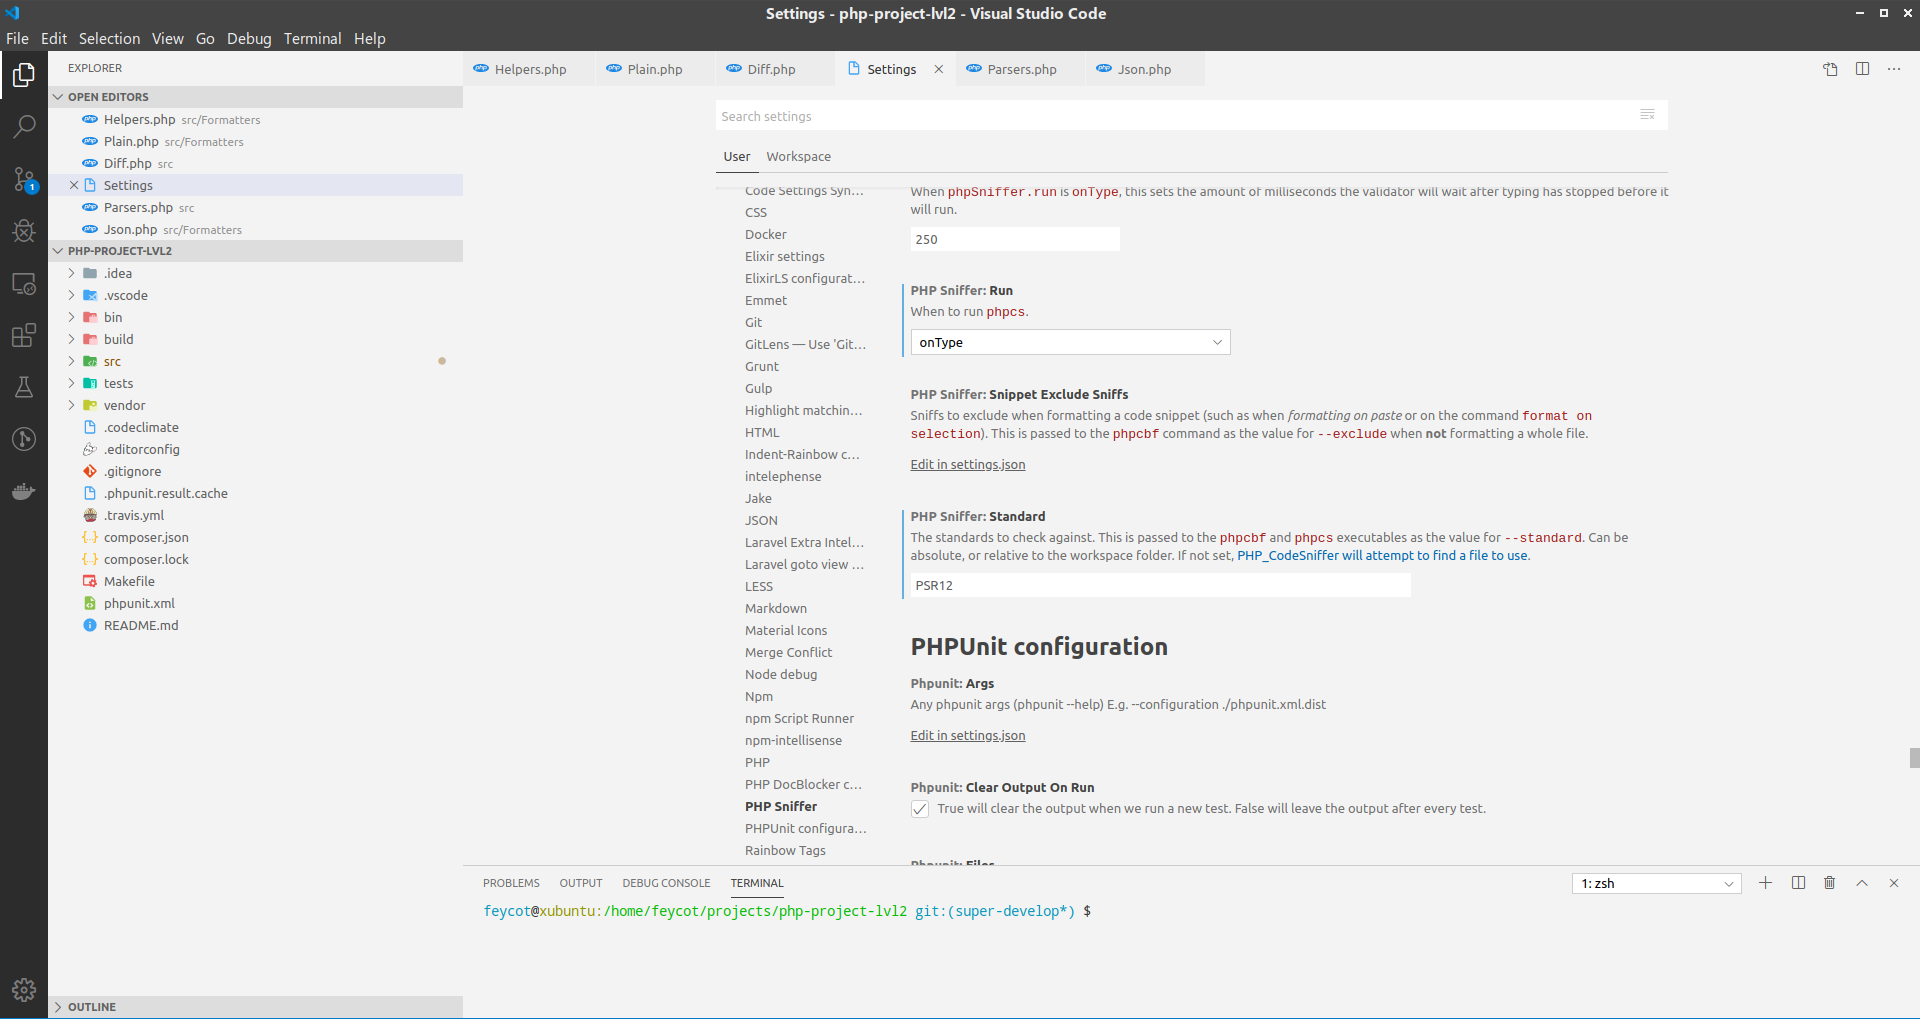
 Так может выглядеть интерфейс редактора после установки расширений
Основные возможности
- отладчик кода
- встроенный терминал
- удобные инструменты для работы с Git
- подсветка синтаксиса для множества популярных языков и файловых форматов
- удобная навигация
- встроенный предпросмотр Markdown
- умное автодополнение
- встроенный пакетный менеджер
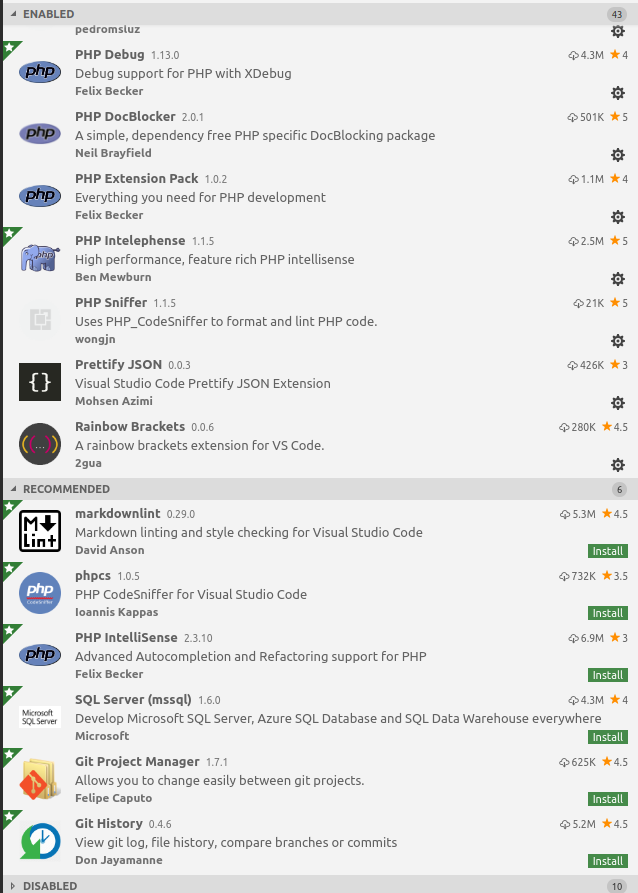
VS Code имеет большое количество расширений для разработчика. Для установки нового пакета зайдите во вкладку “Extensions”, введите название пакета в строке поиска, нажмите кнопку “Install”.
EditorConfig for VS Code
EditorConfig — это конфигурационный файл и набор расширений к большому количеству редакторов кода. Он подхватывает настройки из файла .editorconfig , который, как правило, размещается в корне проекта. Расширение автоматически настроит отступы и перевод строк единообразно для всех разработчиков, использующих его. PHP код чаще всего выполняется на *nix системах, поэтому необходимо использовать стандарт.
Ниже приводится пример файла .editorconfig , который используется в Laravel:
PHP Intelephense
В редакторе уже есть поддержка синтаксиса и подсказок стандартных функций языка. Но без специального дополнения редактор не будет подсказывать пользовательские функции из других частей проекта. Поэтому для поддержки автодополнения, анализа кода, перехода к месту, где создана функция/класс/переменная (с помощью шортката Alt+Click ), используется дополнение PHP Intelephense
Чтобы подсказки не дублировались необходимо отключить встроенную в редактор поддержку кода для PHP: Extensions -> Search @builtin php -> PHP Language Features -> Disable
PHP Debug
При разработке может возникнуть ситуация, когда простых функций отладки и логирования становится недостаточно. Тогда может помочь специальный инструмент — Дебаггер. Для PHP есть расширение xdebug, которое позволяет расставить точки останова и посмотреть окружение в предполагаемом месте ошибки, выполняя код поэтапно либо до следующей точки.
Чтобы воспользоваться PHP Debug, необходимо установить сам XDebug, без него расширение для редактора работать не будет. Установив расширение, необходимо добавить конфигурацию для PHP в разделе Debug . После выбора языка в корне проекта будет создан файл .vscode/launch.json с задачами для Дебаггера. Расширение создаст файл со стандартными параметрами.
Для того, чтобы XDebug общался с нашим дебаггером, необходимо добавить настройки в файл конфигурации php. Чтобы найти этот файл выполните в терминале команду php —ini или запустите веб-сервер с кодом phpinfo() .
В Linux PHP подгружает не только основной файл, но и файл из этой директории. Например, на Ubuntu путь к директории конфигурационных файлов для PHP может быть таким — /etc/php/7.3/cli/conf.d/ . В ней создаём файл с необходимыми правами (требуются root права):
Это настройки для локальной разработки, когда проект разрабатывается и запускается на одном компьютере, например на вашей рабочей машине
PHP Sniffer
В языках программирования есть понятие стиль кодирования. Но не все разработчики знают об этом. Программа, которая отвечает за проверку на соответствие стандартам, называется линтер. В PHP приняты стандарты под названием PSR. Нас интересуют стандарты PSR-1 и PSR-12. Именно эти два стандарта касаются кодирования и правил оформления.
В PHP в качестве линтера используется PHP_CodeSniffer. Для его работы необходимо установить глобально сам линтер composer global require «squizlabs/php_codesniffer=*» и расширение PHP Sniffer.
Проверьте, что линтер установился:
Выполнить проверку кода в терминале можно с помощью команды phpcs , явно указав стандарт, который мы хотим использовать, и путь для проверки:
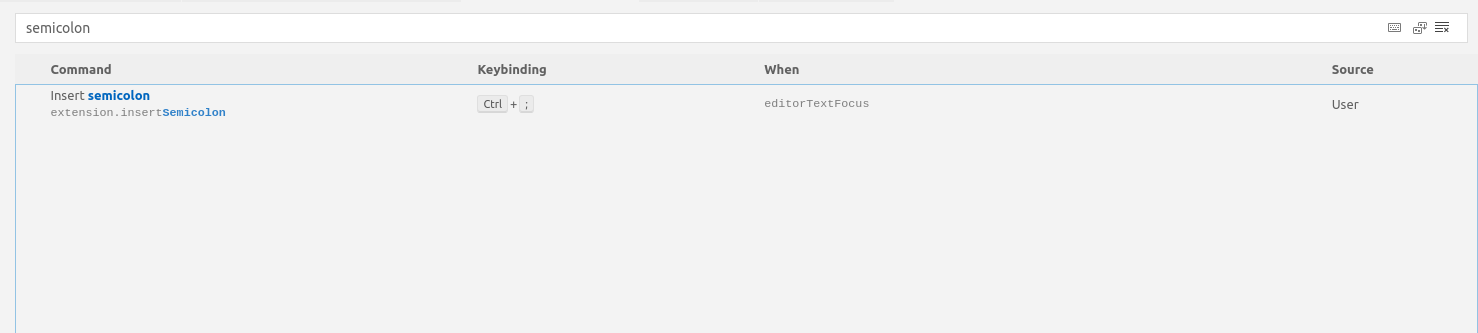
Semicolon Insertion Shortcut
PHP требует разделять инструкции с помощью точки запятой. Расширение Semicolon Insertion Shortcut добавляет необходимый символ в конец строки с помощью шортката. Если при нажатии [Ctrl] + ; символ не вставляется, то необходимо проверить список горячих клавиш и при необходимости назначить комбинацию вручную: File -> Preferences -> Keyboard Shortcuts
Extra
Список расширений, которые могут быть использованы не только для PHP:
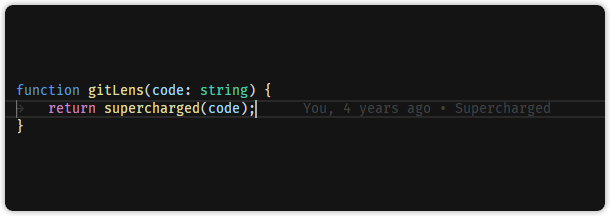
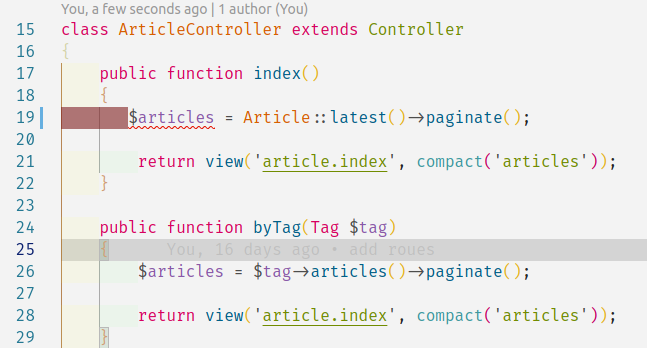
- GitLens — в VS Code уже встроена поддержка Git. Но когда базовых возможностей становится недостаточно, на помощь может придти Gitlens. Например, одна из полезных фич — git blame на текущей строке.
- Indent Rainbow — разноцветные отступы в коде. Подсвечивает некорректный отступ. Можно вместо радуги установить оттенки серого.
Settings Sync — плагин, позволяющий синхронизировать настройки редактора между разными компьютерами. В качестве облачного хранилища используется Github Gists. Все настройки можно скачать, указав нужный файл синхронизации.
Fira Code — моноширинный шрифт, в котором используются лигатуры (объединяет несколько символов в один) для общих комбинаций символов в программировании. Визуальная надстройка для более удобного чтения кода.
Источник
PHP in Visual Studio Code
Visual Studio Code is a great editor for PHP development. You get features like syntax highlighting and bracket matching, IntelliSense (code completion), and snippets out of the box and you can add more functionality through community-created VS Code extensions.
Linting
VS Code uses the official PHP linter ( php -l ) for PHP language diagnostics. This allows VS Code to stay current with PHP linter improvements.
Tip: Using XAMPP? Install the full version of PHP in order to obtain the development libraries.
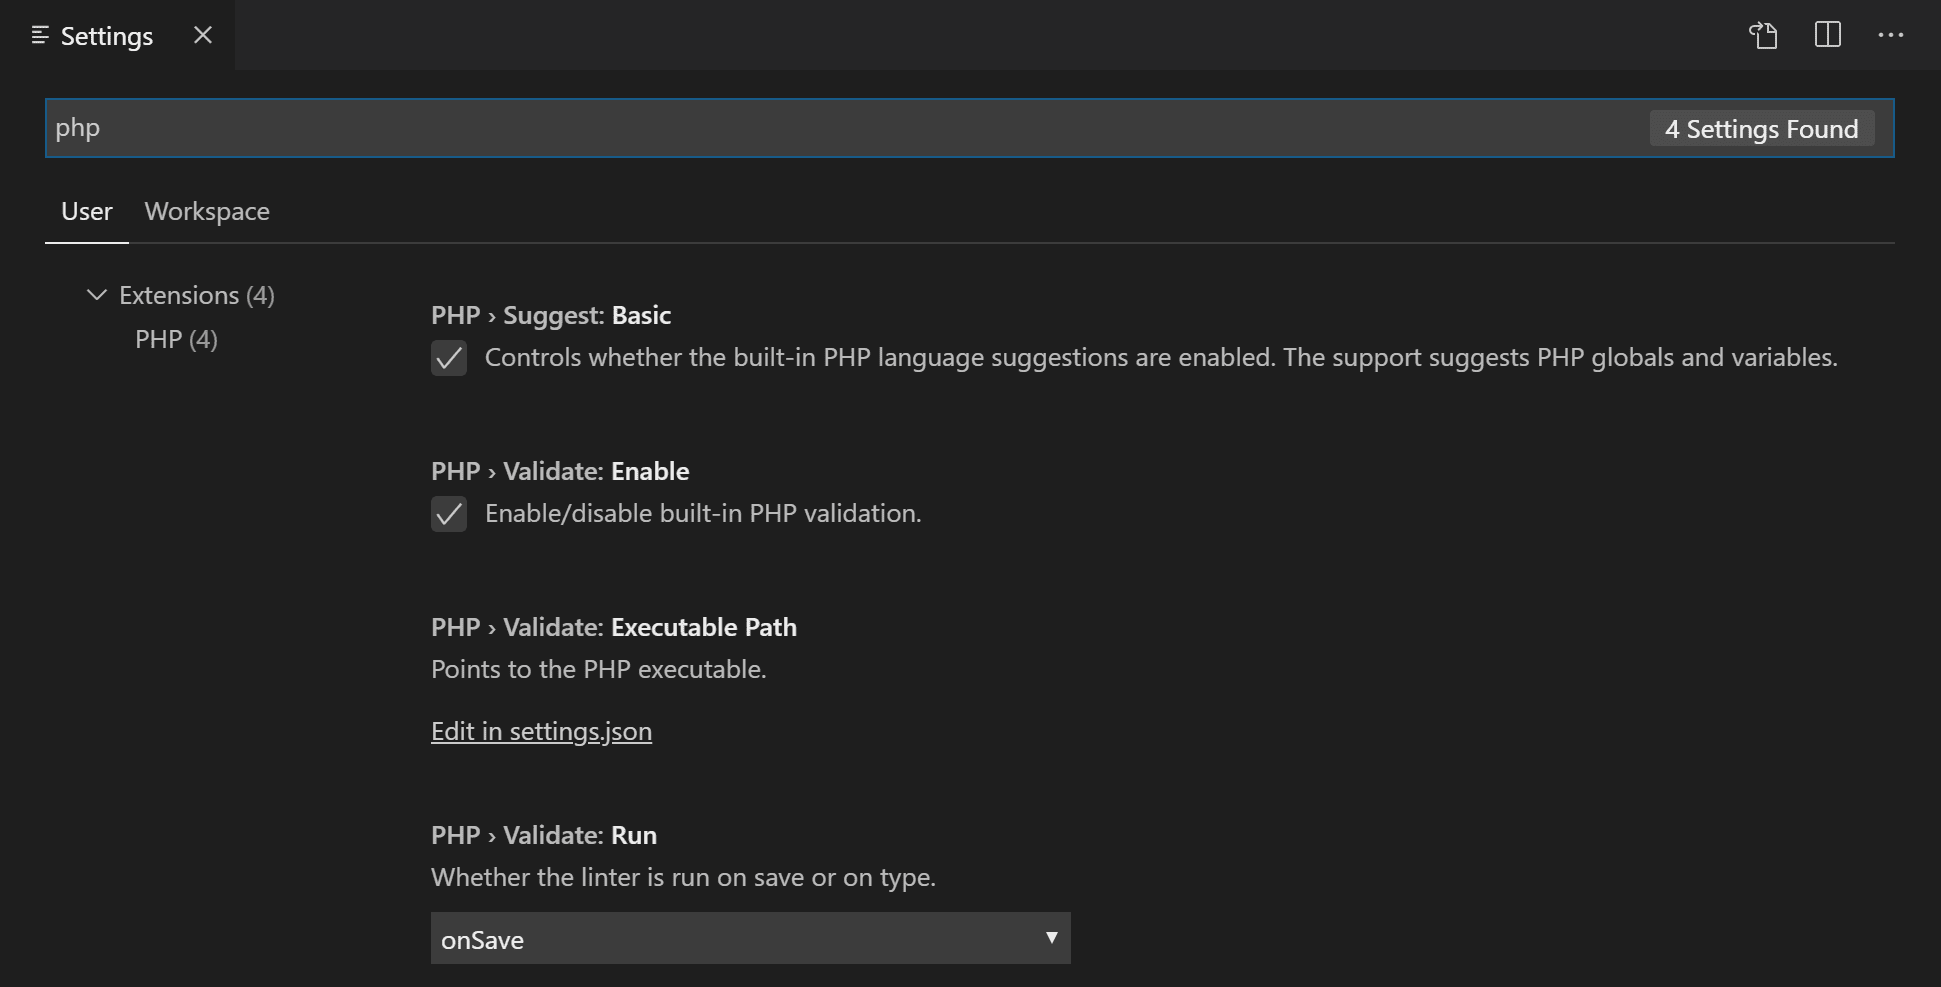
There are three settings to control the PHP linter:
- php.validate.enable : controls whether to enable PHP linting at all. Enabled by default.
- php.validate.executablePath : points to the PHP executable on disk. Set this if the PHP executable is not on the system path.
- php.validate.run : controls whether the validation is triggered on save (value: «onSave» ) or on type (value: «onType» ). Default is on save.
To change the PHP settings, open your User or Workspace Settings ( ⌘, (Windows, Linux Ctrl+, ) ) and type ‘php’ to filter the list of available settings.
To set the PHP executable path, select the Edit in settings.json link under PHP > Validate: Executable Path, which will open your user settings.json file. Add the php.validate.executablePath setting with the path to your PHP installation:
Windows:
Linux and macOS:
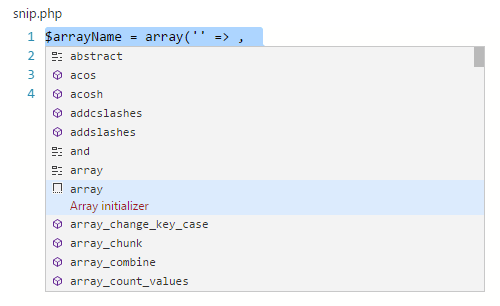
Snippets
Visual Studio Code includes a set of common snippets for PHP. To access these, hit ⌃Space (Windows, Linux Ctrl+Space ) to get a context-specific list.
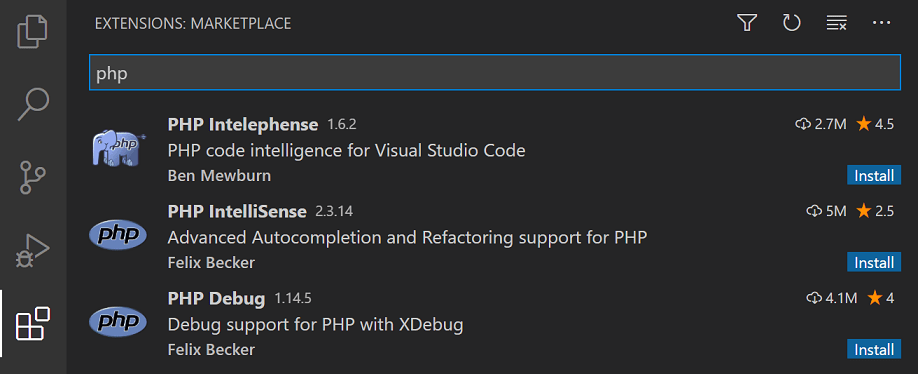
PHP extensions
There are many PHP language extensions available on the VS Code Marketplace and more are being created. You can search for PHP extensions from within VS Code in the Extensions view ( ⇧⌘X (Windows, Linux Ctrl+Shift+X ) ) then filter the extensions dropdown list by typing ‘php’.
Disable built-in PHP support
To disable the built-in PHP smart completions in favor of suggestions from an installed PHP extension, uncheck PHP > Suggest: Basic, which sets php.suggest.basic to false in your settings.json file.
Debugging
PHP debugging with XDebug is supported through a PHP Debug extension. Follow the extension’s instructions for configuring XDebug to work with VS Code.
Next steps
Read on to find out about:
- Extension Marketplace — Browse the extensions others have shared
- Debugging — Learn more about VS Code debugging
Источник
IntelliSense
IntelliSense is a general term for various code editing features including: code completion, parameter info, quick info, and member lists. IntelliSense features are sometimes called by other names such as «code completion», «content assist», and «code hinting.»
IntelliSense for your programming language
Visual Studio Code IntelliSense is provided for JavaScript, TypeScript, JSON, HTML, CSS, SCSS, and Less out of the box. VS Code supports word based completions for any programming language but can also be configured to have richer IntelliSense by installing a language extension.
Below are the most popular language extensions in the Marketplace. Select an extension tile below to read the description and reviews to decide which extension is best for you.
IntelliSense features
VS Code IntelliSense features are powered by a language service. A language service provides intelligent code completions based on language semantics and an analysis of your source code. If a language service knows possible completions, the IntelliSense suggestions will pop up as you type. If you continue typing characters, the list of members (variables, methods, etc.) is filtered to only include members containing your typed characters. Pressing Tab or Enter will insert the selected member.
You can trigger IntelliSense in any editor window by typing ⌃Space (Windows, Linux Ctrl+Space ) or by typing a trigger character (such as the dot character ( . ) in JavaScript).
Tip: The suggestions widget supports CamelCase filtering, meaning you can type the letters which are upper cased in a method name to limit the suggestions. For example, «cra» will quickly bring up «createApplication».
If you prefer, you can turn off IntelliSense while you type. See Customizing IntelliSense below to learn how to disable or customize VS Code’s IntelliSense features.
As provided by the language service, you can see quick info for each method by either pressing ⌃Space (Windows, Linux Ctrl+Space ) or clicking the info icon. The accompanying documentation for the method will now expand to the side. The expanded documentation will stay so and will update as you navigate the list. You can close this by pressing ⌃Space (Windows, Linux Ctrl+Space ) again or by clicking on the close icon.

After choosing a method you are provided with parameter info.
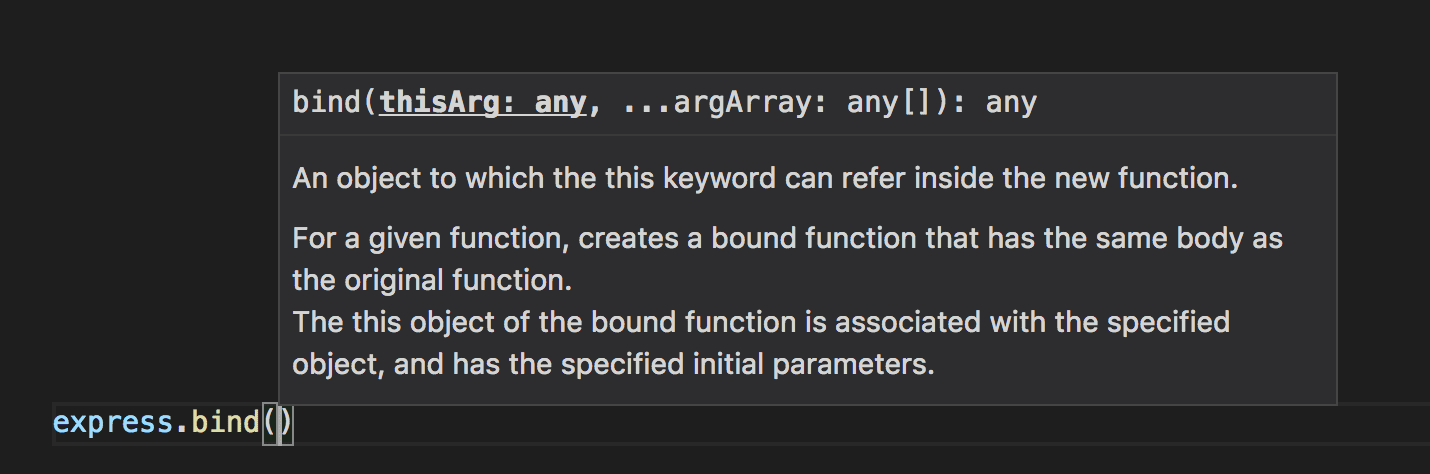
When applicable, a language service will surface the underlying types in the quick info and method signatures. In the image above, you can see several any types. Because JavaScript is dynamic and doesn’t need or enforce types, any suggests that the variable can be of any type.
Types of completions
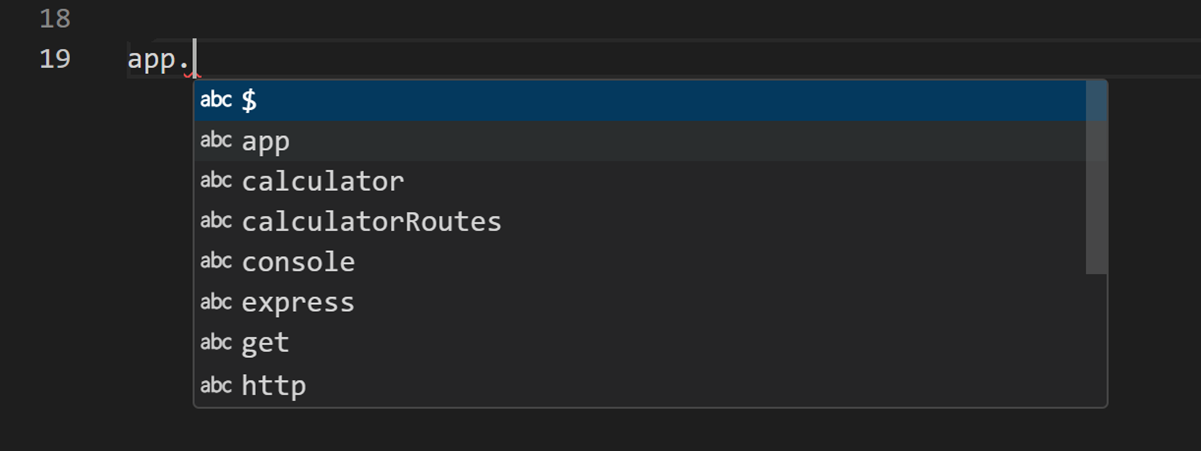
The JavaScript code below illustrates IntelliSense completions. IntelliSense gives both inferred proposals and the global identifiers of the project. The inferred symbols are presented first, followed by the global identifiers (shown by the Word icon).
VS Code IntelliSense offers different types of completions, including language server suggestions, snippets, and simple word based textual completions.
 | Methods and Functions | method , function , constructor |
 | Variables | variable |
 | Fields | field |
 | Type parameters | typeParameter |
 | Constants | constant |
 | Classes | class |
 | Interfaces | interface |
 | Structures | struct |
 | Events | event |
 | Operators | operator |
 | Modules | module |
 | Properties and Attributes | property |
 | Values and Enumerations | value , enum |
 | References | reference |
 | Keywords | keyword |
 | Files | file |
 | Folders | folder |
 | Colors | color |
 | Unit | unit |
 | Snippet prefixes | snippet |
 | Words | text |
Customizing IntelliSense
You can customize your IntelliSense experience in settings and key bindings.
Settings
The settings shown below are the default settings. You can change these settings in your settings.json file as described in User and Workspace Settings.
Tab Completion
The editor supports «tab completion» which inserts the best matching completion when pressing Tab . This works regardless of the suggest widget showing or not. Also, pressing Tab after inserting a suggestions will insert the next best suggestion.

By default, tab completion is disabled. Use the editor.tabCompletion setting to enable it. These values exist:
- off — (default) Tab completion is disabled.
- on — Tab completion is enabled for all suggestions and repeated invocations insert the next best suggestion.
- onlySnippets — Tab completion only inserts static snippets which prefix match the current line prefix.
Locality Bonus
Sorting of suggestions depends on extension information and on how well they match the current word you are typing. In addition, you can ask the editor to boost suggestions that appear closer to the cursor position, using the editor.suggest.localityBonus setting.
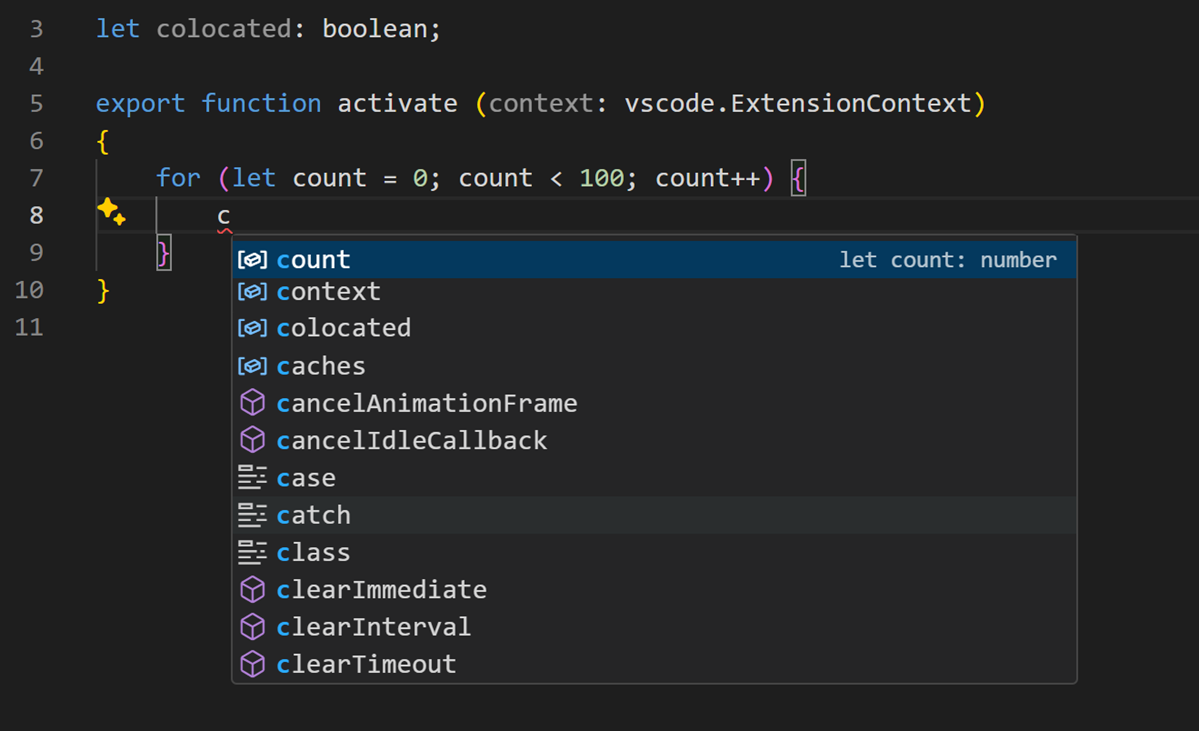
In above images you can see that count , context , and colocated are sorted based on the scopes in which they appear (loop, function, file).
Suggestion selection
By default, VS Code pre-selects the previously used suggestion in the suggestion list. This is very useful as you can quickly insert the same completion multiple times. If you’d like different behavior, for example, always select the top item in the suggestion list, you can use the editor.suggestSelection setting.
The available editor.suggestSelection values are:
- first — Always select the top list item.
- recentlyUsed — (default) The previously used item is selected unless a prefix (type to select) selects a different item.
- recentlyUsedByPrefix — Select items based on previous prefixes that have completed those suggestions.
«Type to select» means that the current prefix (roughly the text left of the cursor) is used to filter and sort suggestions. When this happens and when its result differs from the result of recentlyUsed it will be given precedence.
When using the last option, recentlyUsedByPrefix , VS Code remembers which item was selected for a specific prefix (partial text). For example, if you typed co and then selected console , the next time you typed co , the suggestion console would be pre-selected. This lets you quickly map various prefixes to different suggestions, for example co -> console and con -> const .
Snippets in suggestions
By default, VS Code shows snippets and completion proposals in one widget. You can control the behavior with the editor.snippetSuggestions setting. To remove snippets from the suggestions widget, set the value to «none» . If you’d like to see snippets, you can specify the order relative to suggestions; at the top ( «top» ), at the bottom ( «bottom» ), or inline ordered alphabetically ( «inline» ). The default is «inline» .
Key bindings
The key bindings shown below are the default key bindings. You can change these in your keybindings.json file as described in Key Bindings.
Note: There are many more key bindings relating to IntelliSense. Open the Default Keyboard Shortcuts (File > Preferences > Keyboard Shortcuts) and search for «suggest».
Troubleshooting
If you find IntelliSense has stopped working, the language service may not be running. Try restarting VS Code and this should solve the issue. If you are still missing IntelliSense features after installing a language extension, open an issue in the repository of the language extension.
Tip: For configuring and troubleshooting JavaScript IntelliSense, see the JavaScript documentation.
A particular language extension may not support all the VS Code IntelliSense features. Review the extension’s README to find out what is supported. If you think there are issues with a language extension, you can usually find the issue repository for an extension through the VS Code Marketplace. Navigate to the extension’s Details page and select the Support link.
Next steps
IntelliSense is just one of VS Code’s powerful features. Read on to learn more:
- JavaScript — Get the most out of your JavaScript development, including configuring IntelliSense.
- Node.js — See an example of IntelliSense in action in the Node.js walkthrough.
- Debugging — Learn how to set up debugging for your application.
- Creating Language extensions — Learn how to create extensions that add IntelliSense for new programming languages.
Common questions
Why am I not getting any suggestions?

This can be caused by a variety of reasons. First, try restarting VS Code. If the problem persists, consult the language extension’s documentation. For JavaScript specific troubleshooting, please see the JavaScript language topic.
Why am I not seeing method and variable suggestions?
This issue is caused by missing type declaration (typings) files in JavaScript. You can check if a type declaration file package is available for a specific library by using the TypeSearch site. There is more information about this issue in the JavaScript language topic. For other languages, please consult the extension’s documentation.
Источник